Dimensions Illustrator
Script for Adobe Illustrator
Latest update 12/5/2023, version 6.6
Specify dimensions and other properties of selected elements.
- Element dimensions, each selected or combined
- Distance between elements
- Includes scale option
- Corner radius
- Corner angle
- Save and restore all settings
- User-configurable localization
For the InDesign version of this script, see Dimensions InDesign.
FREE 30 DAY TRIAL
Single-user perpetual license
Pay once, no subscription,
use forever
How-to Video
How to use the script
The interface has three sections. The first is four tabs, each a specific type of measurement. The second section is Lines and Text. The last section is Settings, to save and restore options. Select the tab for the type of measurement to add, and set the desired options. Click the OK button to proceed, or Cancel to exit the script.
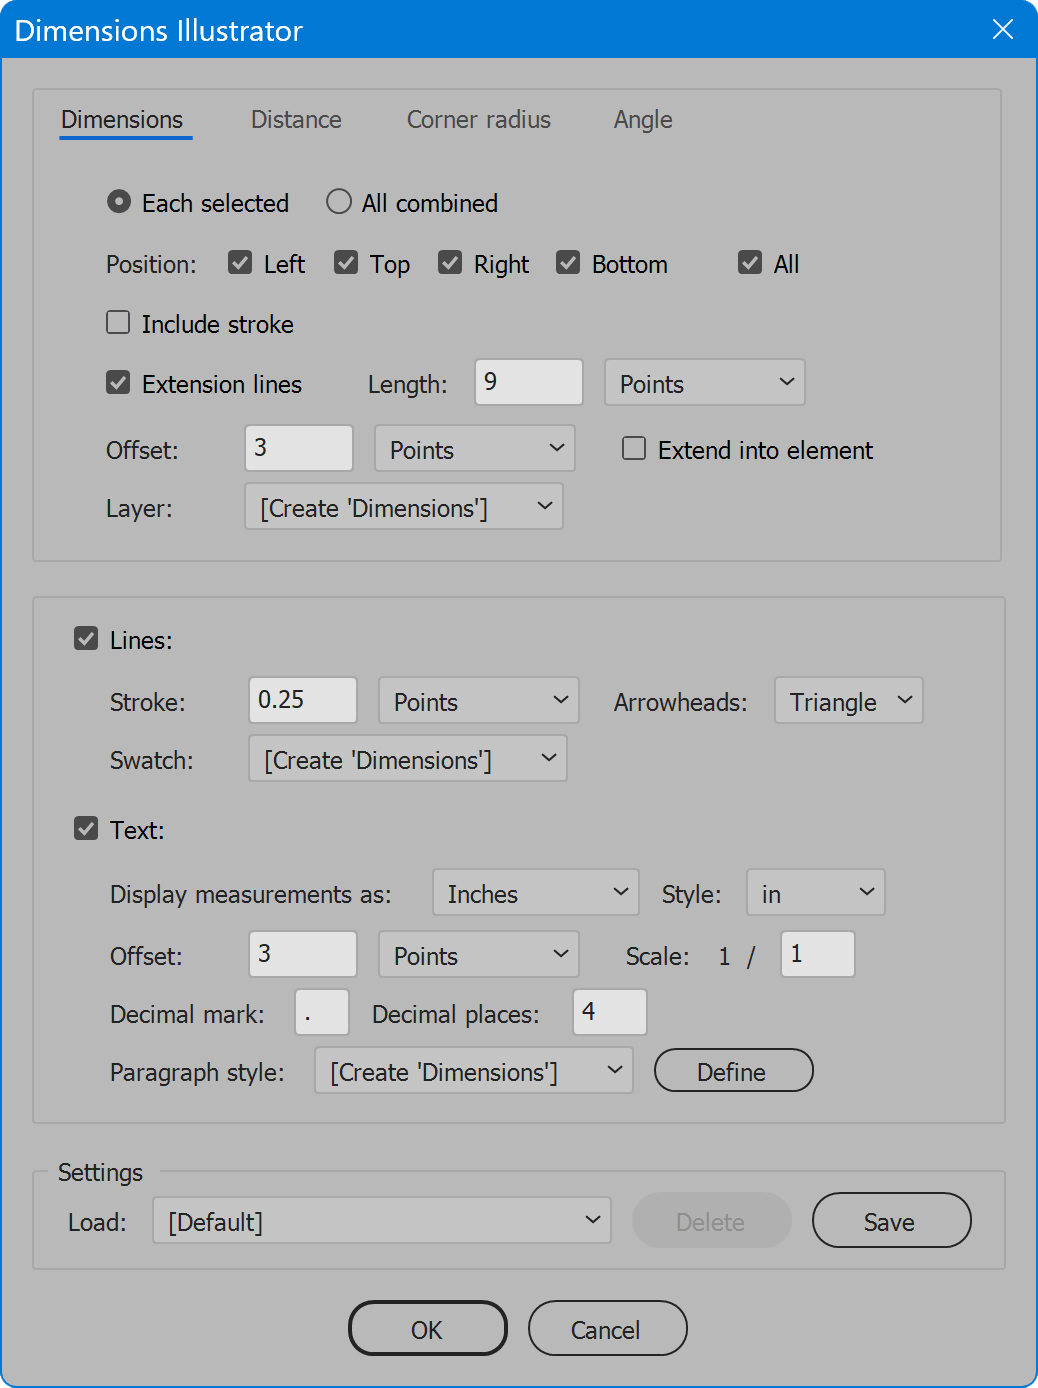
Tab 1: Dimensions
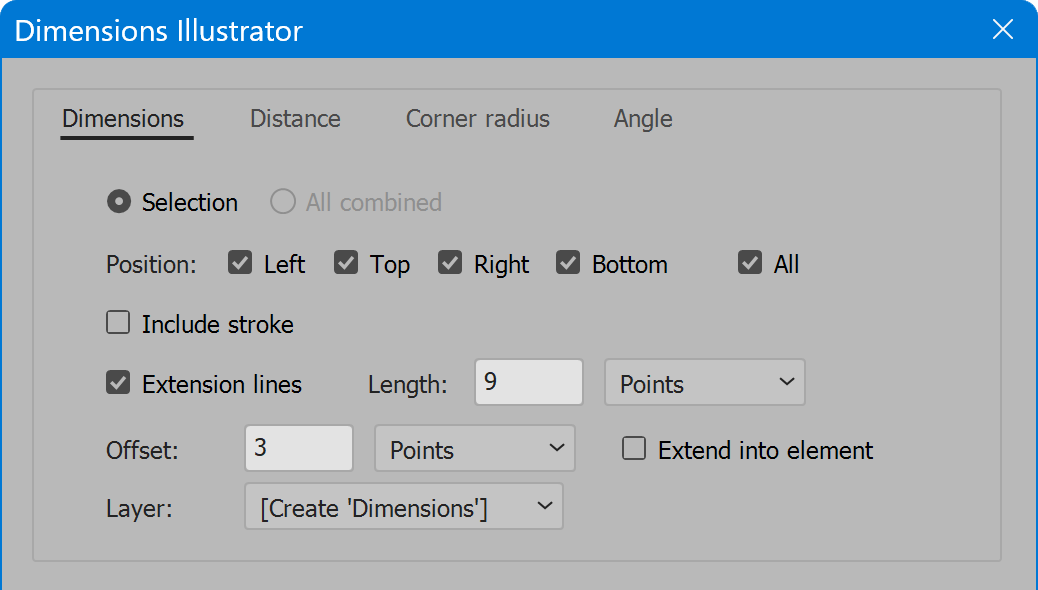
Selection/Each selected — this option changes depending on whether one element is selected, or multiple elements are selected. For a single element, dimensions are added. When multiple elements are selected, independent dimensions are added to each element.
All combined — disabled when one element is selected. When multiple elements are selected, dimensions are added to the overall boundary of all elements selected.
Position — the edges of the element or elements to which dimensions are added. Click the All checkbox to toggle all positions on or off. At least one position must be enabled.
Include stroke — normally dimensions are the boundaries of the element without its stroke. Enable this option to include the element’s stroke width.
Extension lines, Offset, and Layer — see the section All tabs.
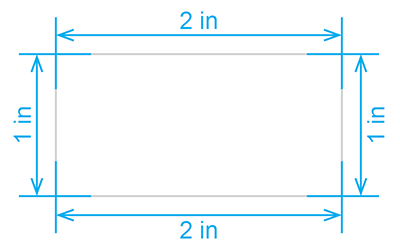
Extend into element — when enabled, the extension lines offset is set to zero and disabled, and extension lines double in the length specified. The original half is outside the element as usual, and the additional half extends into the element. This option creates cross marks at the element corners, as shown below.
Tab 2: Distance
A measure of distance is available when two elements are selected.
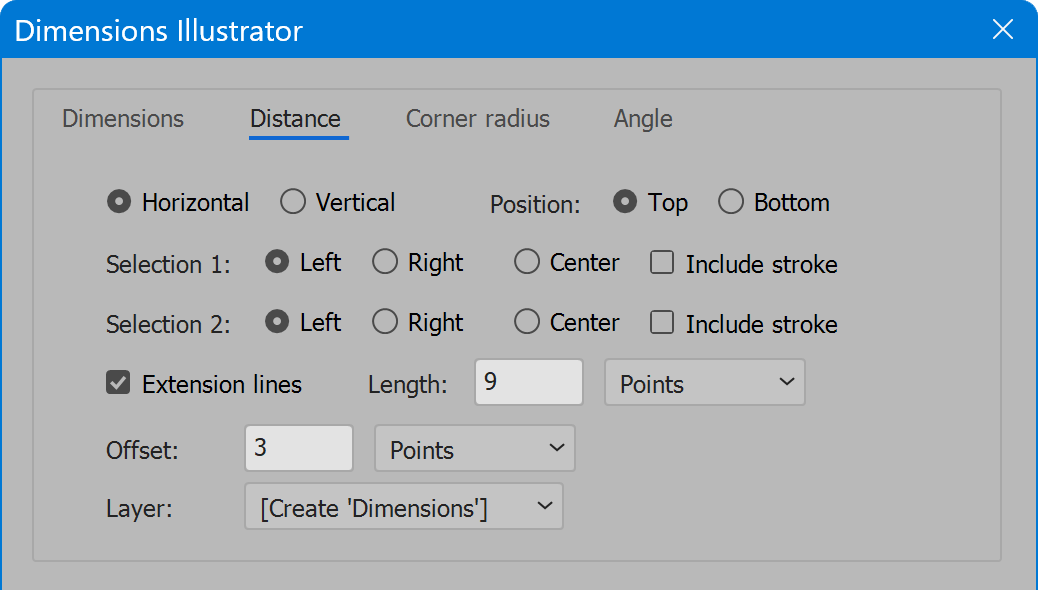
Horizontal/Vertical — the choice to add a horizontal or vertical measure of distance.
Position — the edge to which the distance is added. For horizontal measurements, the choice is top or bottom. For vertical measurements, the choice is left or right. When either element is set to Center, this option only applies to the text position.
Selection 1/Selection 2 — of the two elements selected, the element most left on the page is selection 1, and the element most right on the page is selection 2. For each selection, there is the choice of which edge, or center, to measure from one element to the other. For horizontal measurements, the choices are left, right, or center. For vertical measurements, the choices are top, bottom, or center. The dimension line is positioned center of the element set to center, or selection 1 when both are set to center.
Include stroke — the option is available for each element selected. Normally the distance does not consider either element’s stroke. Enable this option to include one or the other, or both, element’s stroke width. When either element is measured to center, stroke is not a consideration, so the option is disabled.
Extension lines, Offset, and Layer — see the section All tabs.
Tab 3: Corner radius
Corner radius has limitations in the Illustrator version of the script. For important details, see the last section Further reading: differences from the InDesign version of the script.

Corner radius only applies to rectangular elements that have rounded corners. For elements not rectangular, or with square corners, this measurement type has no effect.
Corners — the corners to which radius values are added. Click the All checkbox to toggle all corners on or off. At least one corner must be enabled. When multiple elements are selected, corner radius is added to each element.
Pointers — enable to add a line from the text label to the rounded corner. When enabled, the length of the pointer may be set. Select the measurement units in the drop-down list.
Extension lines, Offset, and Layer — see the section All tabs.
Prefix — a character, or characters, that appear before the corner radius value. Default is the uppercase letter “R” without a space. This results in corner radius labels such as “R0.125 in,” for example. Add a space if desired, or use any other character, or characters.
Tab 4: Angle
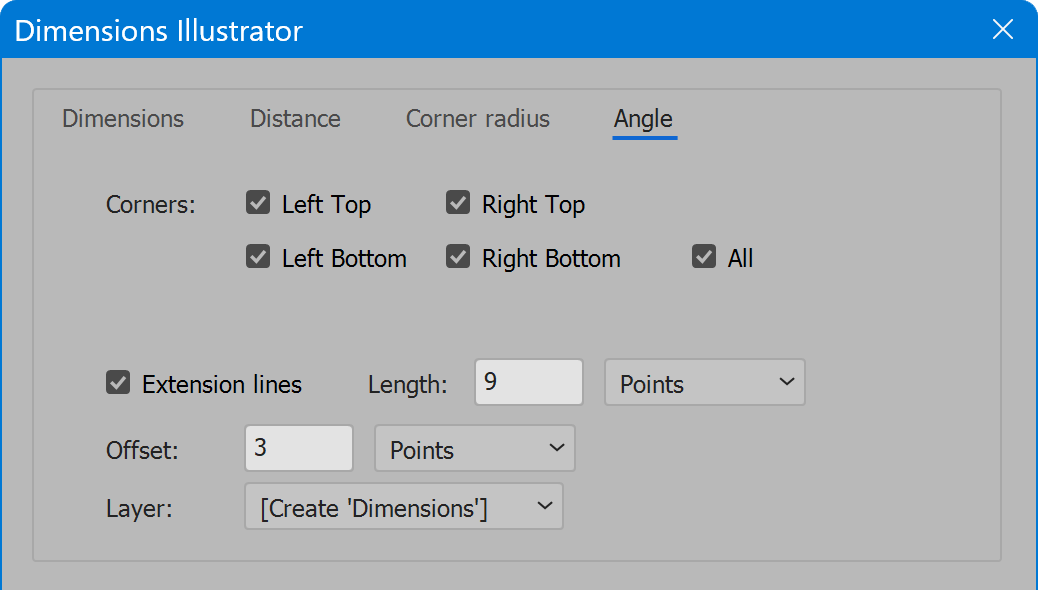
Corners — the corners to which angle values are added. Click the All checkbox to toggle all corners on or off. At least one corner must be enabled. When multiple elements are selected, angles are added to each element.
Extension lines, Offset, and Layer — see the section All tabs.
When adding angle measurements to elements of many points, the result is every point has its angle specified. Polygon elements such as a starburst take time, and the result may be more than desired. Or exactly as desired. Just be aware.
All tabs
Options that apply to all measurement types. Although these options appear identical on the script interface, their values are unique among each tab. For example, extension line length and offset for dimensions may differ from distance, corner radius, and angle.
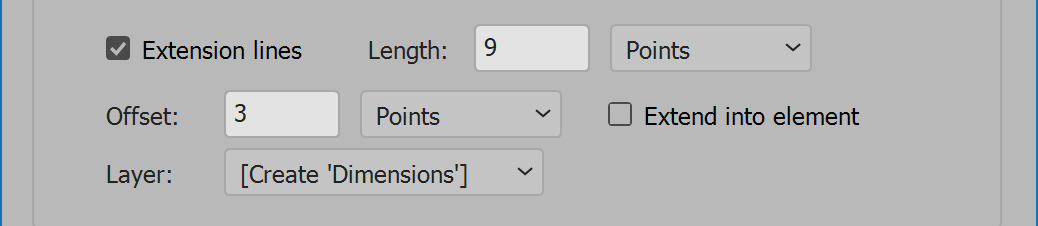
Extension Lines — enable to include extension lines at each end of the measurement line. When enabled, the length of extension lines may be set. Select the measurement units in the drop-down list.
Offset — the distance from the element that measurements are placed. Select the measurement units in the drop-down list. When Extension lines are enabled, the offset is from the element to the extension lines, and the measurement line is offset from that half the length of the extension lines, to center it within them. When extension lines are disabled, the offset is the distance from the element to the measurement line, not considering arrowheads.
Layer — the layer to which measurements are added. The list defaults to a layer named ‘Dimensions.’ If the layer does not exist, the choice [Create 'Dimensions'] appears in the drop-down list. This choice creates the layer.
The layer option is repeated on each tab, but its value is not shared among tabs. Meaning each measurement type may be drawn to a different layer, if desired. Doing so only requires the layers be created beforehand, so each may be selected in the tab’s Layer drop-down list.
Section 2: Lines and Text
Options that apply to all measurement types. If either Lines or Text are unchecked, they are not drawn.
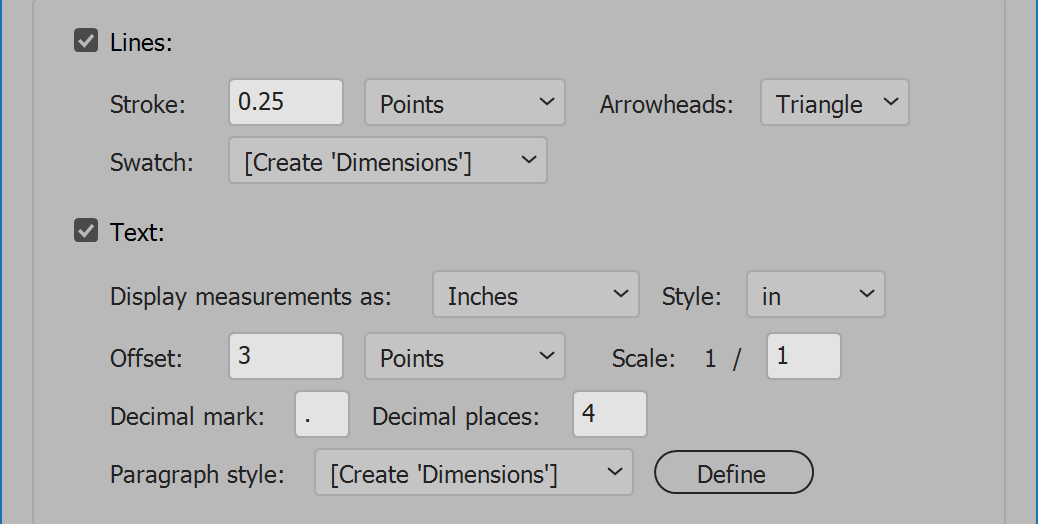
Lines
Stroke — the width of strokes used to draw measurement lines, extension lines, and pointer lines for corner radius. Select the measurement units in the drop-down list.
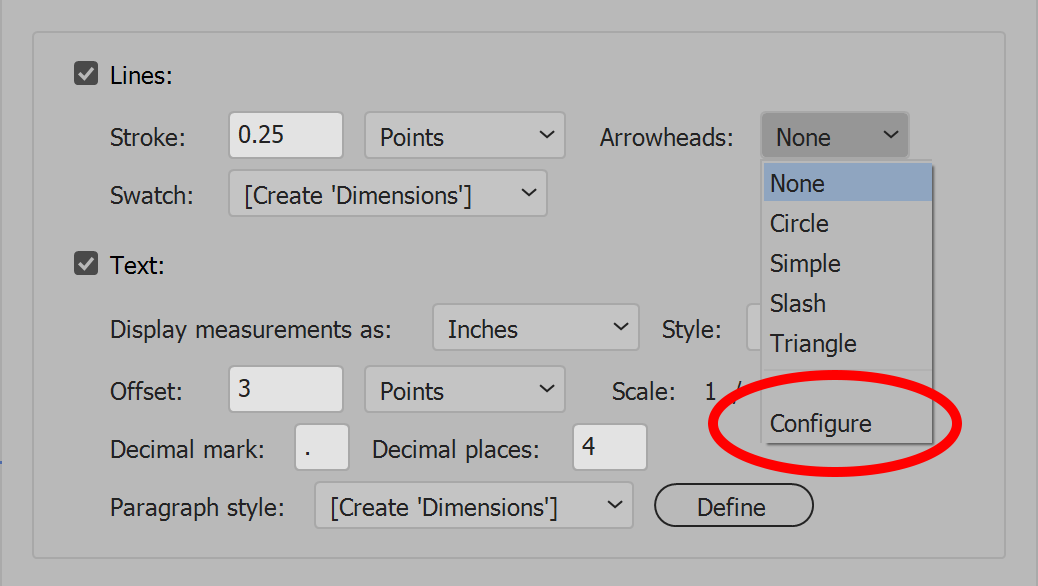
Arrowheads — choose None, or choose from the four available options: Circle, Simple, Slash, or Triangle to include arrowheads at each end of the measurement lines. Arrowheads are added as space permits. For dimension lines of less length than the space required, arrowheads are not added.
Swatch — the swatch used to color the lines. The list defaults to a swatch named ‘Dimensions.’ If the swatch does not exist, the choice [Create 'Dimensions'] appears in the drop-down list. This choice creates the swatch.
Configure Arrowheads
When the Arrowheads drop-down-list is open, at the bottom is the choice Configure. Selecting this opens a new window to alter the appearance of arrowheads.
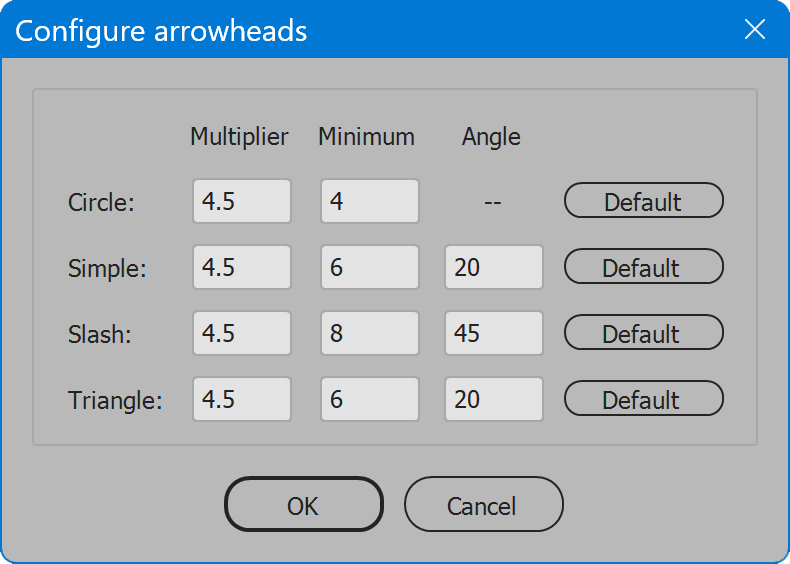
For each of the four arrowhead styles, there are three variables that determine each arrowhead’s appearance (with the exception of Circle, which has only two variables).
The size of each arrowhead is its multiplier times the line stroke weight, but not less than the minimum, which is the minimum size in points. For Simple and Triangle, the angle is degrees from the measurement line. Slash angle is degrees from extension line. Angle does not apply to Circle arrowheads. Also beside each row of inputs is a button Default, which restores the corresponding arrowhead to its default values.
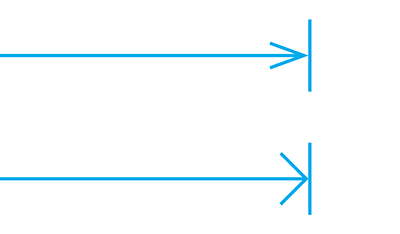
Experiment with values to get the preferred appearance of each arrowhead. See the example below, Simple arrowhead set to 20 degrees angle (the default), and again set to 45 degrees.
Text
Display measurements as — the measurement units (inches, points, mm, etc.) that appear in text labels. Angle ignores this option, as angles are always expressed in degrees.
Style — how the measurement units are expressed. For example, Feet & Inches may display 6 ft 7 in, 6 ft. 7 in., 6 feet 7 inches, or 6' 7". The choices vary depending on the measurement units selected. There is also the choice “None” to omit any indication of the measurement units. However, to keep feet and inches from crashing together, a dash is inserted between them. Angle ignores this option.
Offset — the distance from the measurement line to the text label for the measurement value. Select the measurement units in the drop-down list.
Scale — a divisor that alters the value of text labels, for layouts not built to actual size. Set as desired, or use 1 / 1 for actual size.
Decimal mark — enter the desired character to separate the integer portion from the fractional portion of values in text labels, typically a period (dot, point), or comma.
Decimal places — the number of decimal places that appear in text labels when values are not whole numbers. Angle values are limited to two decimal places, or less if set lower by this option.
Paragraph style — the paragraph style used to format the text label. The list defaults to a paragraph style named ‘Dimensions.’ If the style does not exist, the choice [Create 'Dimensions'] appears in the drop-down list. This choice creates the paragraph style.
Define/Font — When the paragraph style is set to [Create 'Dimensions'], the button to the right becomes Define. In the list of paragraph styles there is also the choice [None]. When selected, the button to the right becomes Font. For any other paragraph style selected, the button is disabled. When active, the button opens a new window to set the font name, size, and swatch. When the paragraph style choice is [Create 'Dimensions'], the values are applied to the paragraph style created and used to style text labels. When the paragraph style choice is [None], the values are assigned directly to each text label, and none are linked to any paragraph style.
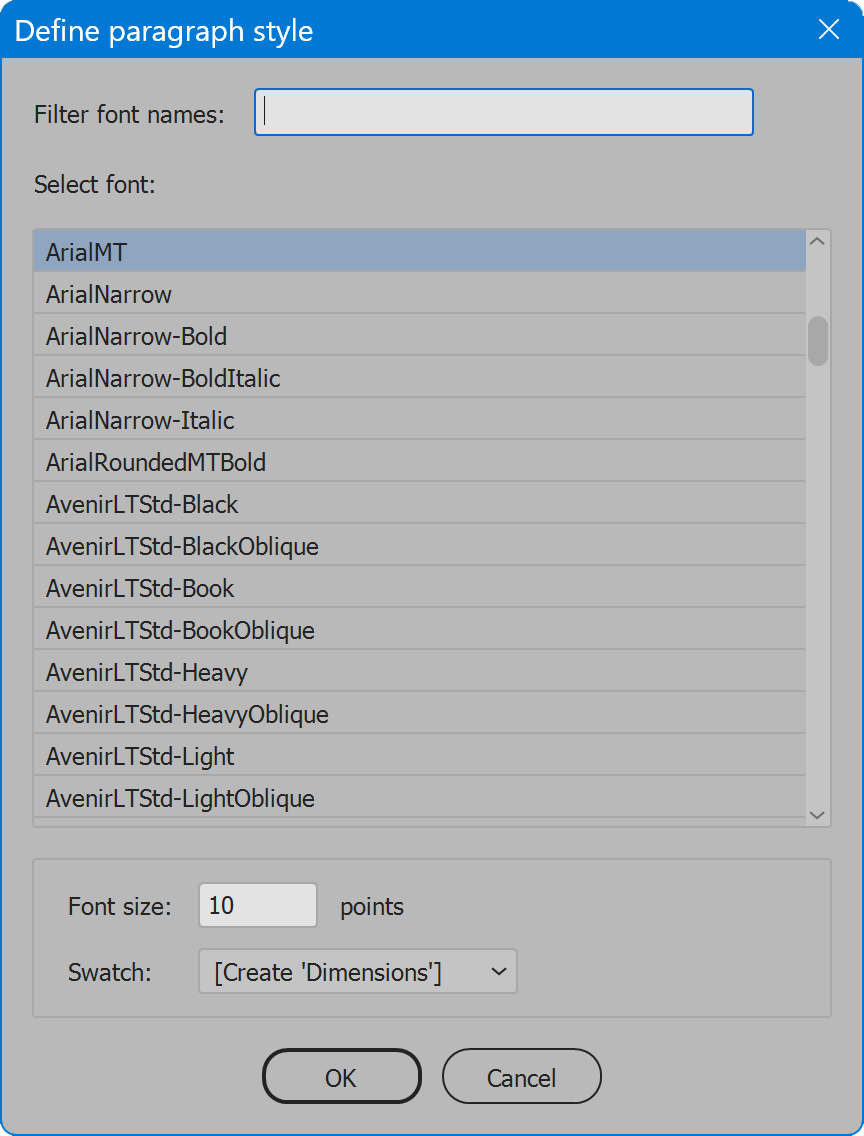
For long font lists, use the input field Filter font names to narrow the list to a specific name. Select the desired font in the list. Lower, enter the desired font size in points, and choose the desired swatch from the drop-down list. The list defaults to a swatch named ‘Dimensions.’ If the swatch does not exist, the choice [Create 'Dimensions'] appears in the drop-down list. This choice creates the swatch. Click OK when the font and swatch are set as desired, or Cancel to ignore any changes.
Section 3: Settings
The current options may be saved and restored later. Select from the Load drop-down list to choose saved settings, and the current options are updated. Click the Delete button, and the saved settings selected in the Load drop-down list are permanently removed. Click the Save button, provide a name for the settings, and the current options are preserved. If the name already exists, the user may choose to replace the saved settings. Or click the checkbox Replace settings, and choose the settings to replace.
The script provides default saved settings named [Default]. These settings cannot be deleted but may be updated to the current values. Save settings, click the checkbox Replace settings, and choose [Default].
Further reading: differences from the InDesign version of the script
For the InDesign version of this script, see Dimensions InDesign. Because of differences between Illustrator and InDesign, each version of the script has differences in functionality.
First a word about element rotation, which affects multiple options. InDesign allows users to specify the rotation angle of elements. If a rotated element’s angle is changed back to zero, the element is un-rotated. Or if changed to another value, the element is rotated the new value. Illustrator does not have similar functionality. Yes elements may be rotated by any degree, but elements do not have a property that remembers their rotation angle from zero. In Illustrator, elements are simply a collection of points, which may result in the appearance of a rotated element, or not.
Dimensions, rotate with selection — because Illustrator lacks the property rotation angle, the option Rotate with selection is absent. Regardless of whether an element appears rotated or not, dimensions are always the rectangular boundary of the element, or elements.
Dimensions of text — the Illustrator version does not add dimensions to selected text, as the InDesign version does.
Corner radius — InDesign provides a separate property for each corner of a rectangle to indicate the corner is rounded, and the radius value. To report each corner’s radius, it’s a simple matter to read the property and report the value. Illustrator has no such property. The collection of points may result in the appearance of rounded corners, or not.
In Illustrator, rounded corners may be achieved with the effect Stylize > Rounded Corners. But effects, and their properties, are not exposed to the scripting language, so the effect is unknown to the script. As far as the script can tell, the rectangle still has square corners. To get corner radius on elements using the Rounded Corners effect, the user must Expand Appearance (Object menu). This converts the element to a path with actual rounded corners.
To determine if an element has rounded corners, and the value of the radius, the Illustrator version of the script takes its best guess, based on these assumptions:
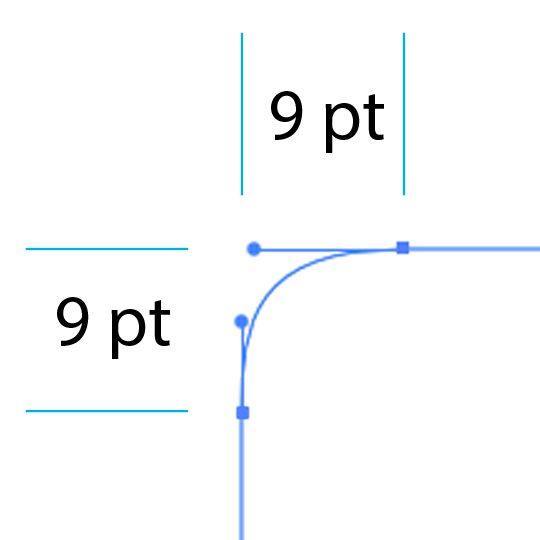
The script examines each corner of the selection that is enabled. If the quadrant for the corner contains two points, and their positions from the corresponding bounding box corner are equal along the X and Y axis, the script assumes the path has a rounded corner, and the radius value is the matching X/Y distance. This assumption could be wrong — the segment between the points could be a straight line. But given the user is unlikely to request corner radius for such a shape, this is the best assumption.
If the quadrant has two points, but the X/Y distances from corner are not equal, the script ignores the element. The corner could be rounded, but without sophisticated intelligence (loads of code), the shape is uncertain, and likely not a smoothly rounded corner that we expect, as are all rounded corners in InDesign.
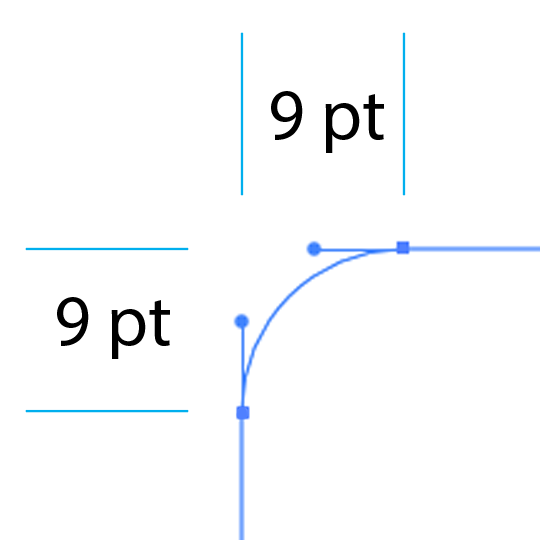
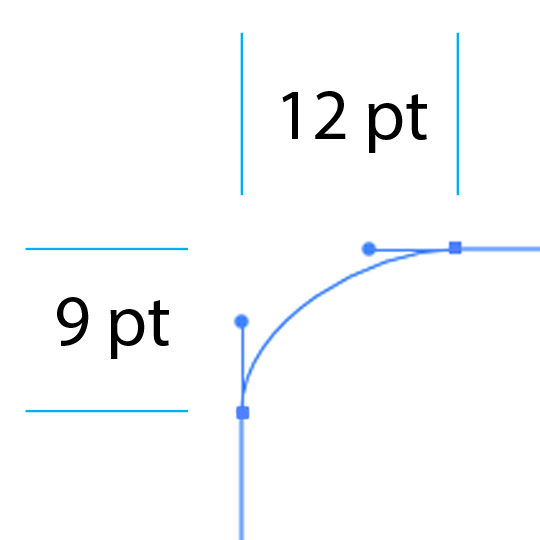
The script’s assumption isn’t perfect, and can be fooled, as in this example. The X/Y distances from corner are equal, but one of the control points is pulled out from the anchor point. The corner is circular, but not smoothly as normally expected for a rounded corner. The script labels the corner radius 9 points, somewhat true, but not precisely. So ensure rounded corners are well-formed. On the upside, a rounded corner that has anchor points correct, but control points off a bit, still adds what is likely the intended corner radius.
Corner radius, rotation — by default, the InDesign version of the script rotates corner radius when the selection is rotated. Because Illustrator lacks the property rotation angle, this does not occur. Further, once a path is rotated, any two points near a perceived corner diverge from equal distance to the bounding box corner, so the first assumption always fails. When asked to add corner radius, such elements are ignored.
Angle tab, rotation angle — the InDesign options Corner angle and Rotation angle are absent because Illustrator lacks the property rotation angle. In Illustrator, Corner angle is the only option, so no need for either choice. In all cases, the result in Illustrator is identical to using the InDesign Corner angle option.
Language
By default the script language is US English, which does not require further download or configuration. To have the script interface display other languages, choose from the available languages below. Download and copy the .i18n file to the script folder alongside the script. When launched, the script detects the language file and displays interface text in that language. If your language is not listed, download the English file and translate it. The file is plain text formatted as JSON, containing interface text in English, and a second value for its translation, which for the English file is the identical text. Copy the file and rename it to replace “en” with the relevant code for your language, then edit the file to change each line’s second value to the translation in your language. For more detailed instructions of how to edit and install i18n files, see How to Localize Scripts.
English: dimensions-illustrator-en-i18n.zip
German: dimensions-illustrator-de-i18n.zip
Italian: dimensions-illustrator-it-i18n.zip
FREE 30 DAY TRIAL
Single-user perpetual license
Pay once, no subscription, use forever
Change log: dimensions-illustrator.txt
For help installing scripts, see How to Install and Use Scripts in Adobe Creative Cloud Applications.
IMPORTANT: scripts are developed for the latest Adobe Creative Cloud applications. Many scripts work in CC 2018 and later, even some as far back as CS6, but may not perform as expected, or run at all, when used in versions prior to 2018. Photoshop features Select Subject and Preserve Details 2.0 definitely fail prior to CC 2018 (version 19) as the features do not exist in earlier versions. For best results use the latest versions of Adobe Creative Cloud applications.
IMPORTANT: by downloading any of the scripts on this page you agree that the software is provided without any warranty, express or implied. USE AT YOUR OWN RISK. Always make backups of important data.
IMPORTANT: fees paid for software products are the purchase of a non-exclusive license to use the software product and do not grant the purchaser any degree of ownership of the software code. Author of the intellectual property and copyright holder William Campbell retains 100% ownership of all code used in all software products regardless of the inspiration for the software product design or functionality.
