Data Merge Export
Script for Adobe InDesign
Latest update 5/23/2024, version 2.7
Add a merge field for full path and file name and the script uses the column to export each record. Not limited to PDF format.
- Name each output file by column in merge data
- Each record saved to a unique location and/or file name
- Export JPG, PDF (interactive or print), or PNG
- User-configurable localization
FREE 30 DAY TRIAL
Single-user perpetual license
Pay once, no subscription,
use forever
How-to Video
NOTE: after video production, features have been added in response to user feedback: Replace <n> with Forced Line Break, <p> with End of Paragraph. See instructions below for details.
Before using the script
These instructions assume you have a Data Merge document prepared. Doing so is beyond the scope of these instructions for the script. There are plenty of resources online that explain how to accomplish Data Merge in InDesign. Once ready to merge and export PDFs, stop and use this script instead. The script does not work with merged pages. The script does the merging, and in the process, handles the choice of location and file name.
For the script to know how to name records exported, two steps are required.
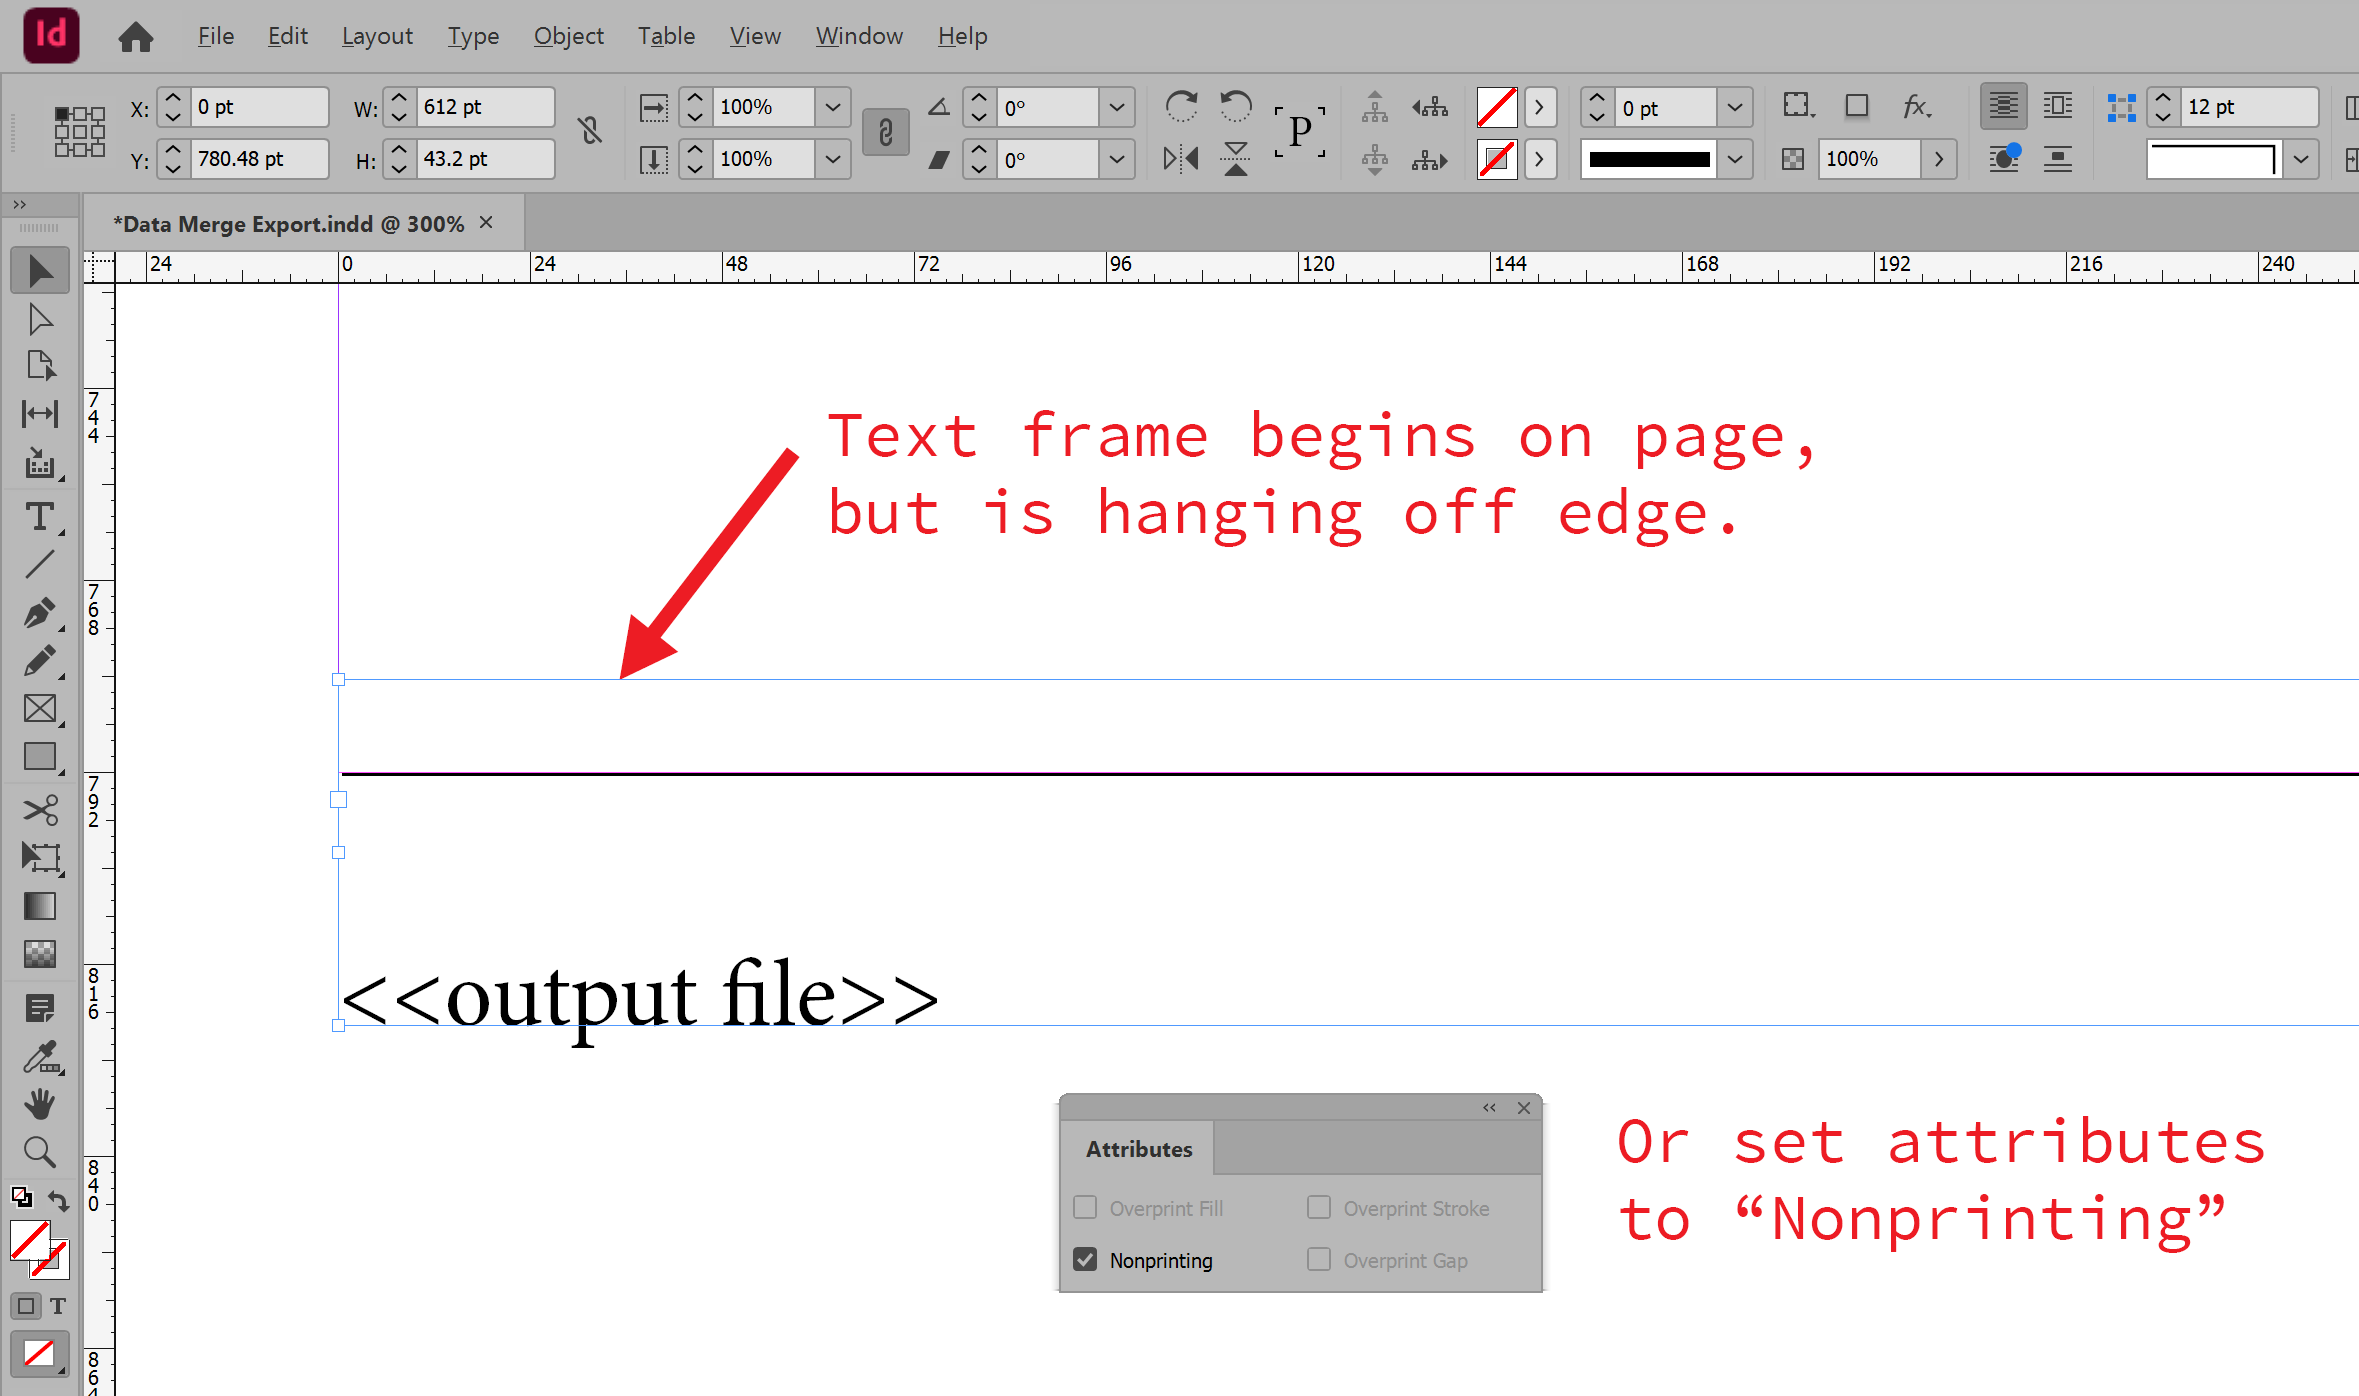
First, add to the merge data a column for full path and file name. Any column label is fine because the user selects it in the script interface. But do not add the @ symbol prefix. It may seem needed because the data looks like an image to import. It is not. This column is text added to the page for the script to pick up and use to name the output file. Then in rows of the additional column, for each record list the full path and file name desired. Do not include a file extension. The script adds the extension based on the file format selected in the interface.

Second, the additional column is the same as any other text field to merge, and it needs to be appear somewhere on the page. Do this by dragging it from the Data Merge panel to a text frame, or entering it manually, for instance, “<<output file>>” in this example. However, it’s unlikely you want this to appear on the output. Moving the text frame off the page won’t work. Data Merge ignores content on the pasteboard. To overcome this limitation, there are two options: create a text frame that has some portion on the page, but most hanging off the page, making the text field to merge off the page. Or set the text frame attributes to Nonprinting (menu Window, Output, Attributes).
IMPORTANT. The additional text field for output file path and name must appear on a document page, NOT a parent page. If placed on a parent page, the script will fail. And because Data Merge does not allow placing fields on both parent and document pages, rather all on one or the other, the script requires all data merge fields are placed on a document page.
With those two steps done, the hard part is over. From here using the script is a breeze.
How to use the script
Have the un-merged InDesign document open, and prepared as described above. Open the Scripts panel. In the list, double-click the script Data Merge Export to run it.
The interface has three sections described below. Set the desired options and click the OK button to begin. A progress bar is displayed as records are exported.
Section 1: Output full path and file name
In the drop-down list, select the data merge field that is the file path and name. For instance, “output file” in the example above.
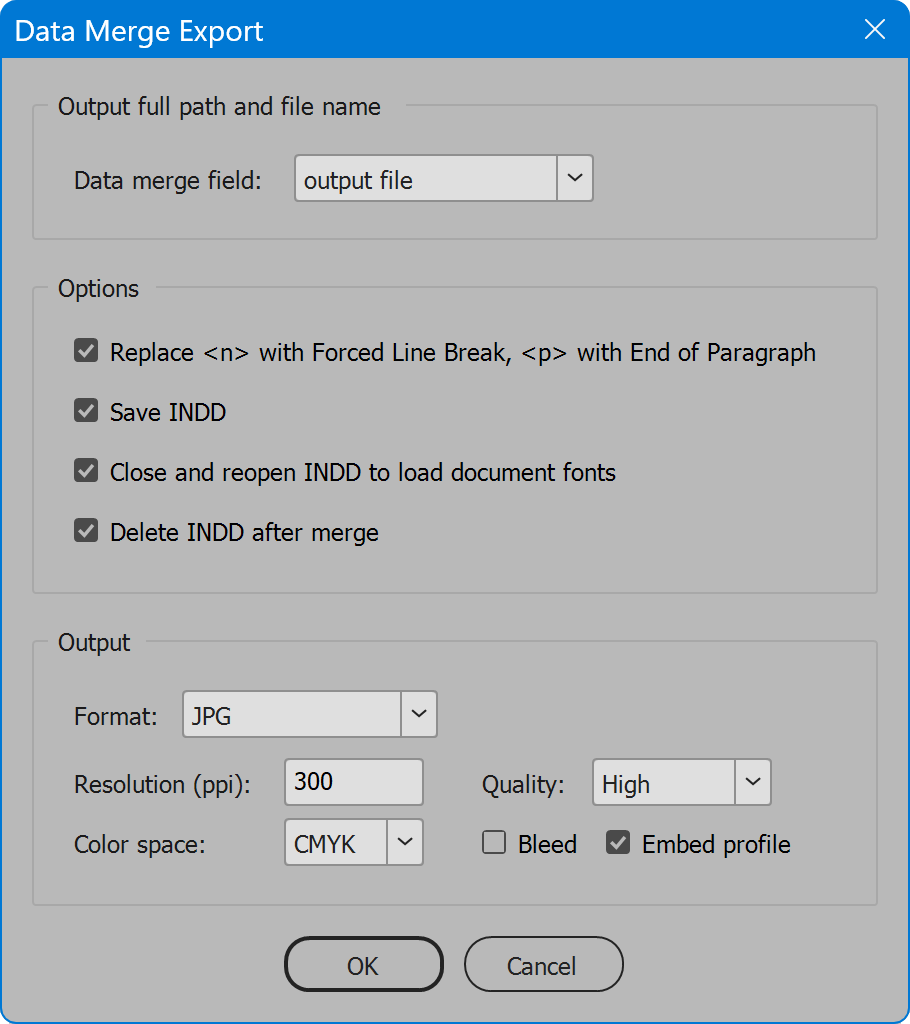
Section 2: Options
Replace <n> with Forced Line Break, <p> with End of Paragraph. — InDesign does not recognize line ends created in Excel and exported to CSV. All text after the line end is ignored. To overcome this limitation, add markers to the text <n> for forced line breaks and <p> for paragraph ends. Enable the option and the markers are replaced with the actual control characters.
Save INDD — enable this option to save an InDesign document of each merged record in the original folder.
Close and reopen INDD to load Document fonts — when InDesign makes a merged copy of the document for output, it doesn't read the Document fonts folder. Not unless saved in the original folder and opened again. Enable the option Save INDD and this option becomes available. Enable and each merged document is closed and reopened before export so the Document fonts folder is loaded. If needed fonts already exist in the system, this option is unnecessary. Use this option only when needed because the the extra steps of closing and reopening each document adds to processing time.
Delete INDD after merge — available when the option above is enabled. If saving INDD only to load the Document fonts folder, you may enable this option to remove the INDD files after exporting is complete. Disable to keep INDD files of the merged documents.
Section 3: Output
Format — select the file format to output. Choices are JPG, PDF (Interactive), PDF (Print), and PNG. Each format offers different options described next.
JPG
Resolution — pixels per inch used to rasterize the pages.
Color Space — choose RGB, CMYK, or Gray.
Quality — choose Maximum, High, Medium, or Low.
Bleed — includes document bleed, if any.
Embed Profile — embeds the current color profile.
PDF (Interactive)
Resolution — pixels per inch for images.
Quality — image quality. Choose Maximum, High, Medium, or Low.
Layers — enable to save each InDesign layer as an Acrobat layer within the PDF.
Tagged — enable to create a tagged PDF.
PDF (Print)
PDF preset — the PDF preset used to export the pages.
PNG
Resolution — pixels per inch used to rasterize the pages.
Color Space — choose RGB or Gray.
Quality — choose Maximum, High, Medium, or Low.
Bleed — includes document bleed, if any.
Transparent — areas of the page uncolored are transparent.
A note about JPG and PNG: there isn’t an option for anti-alias because the script always enables anti-alias when exporting either image format. I couldn’t imagine a need to disable the option considering that without anti-alias, the result is horrible. But perhaps I could be wrong, and there is a need to disable it. Contact me to share other views on the subject.
Language
By default the script language is US English, which does not require further download or configuration. To have the script interface display other languages, choose from the available languages below. Download and copy the .i18n file to the script folder alongside the script. When launched, the script detects the language file and displays interface text in that language. If your language is not listed, download the English file and translate it. The file is plain text formatted as JSON, containing interface text in English, and a second value for its translation, which for the English file is the identical text. Copy the file and rename it to replace “en” with the relevant code for your language, then edit the file to change each line’s second value to the translation in your language. For more detailed instructions of how to edit and install i18n files, see How to Localize Scripts.
English: data-merge-export-en-i18n.zip
FREE 30 DAY TRIAL
Single-user perpetual license
Pay once, no subscription, use forever
Change log: data-merge-export.txt
For help installing scripts, see How to Install and Use Scripts in Adobe Creative Cloud Applications.
IMPORTANT: scripts are developed for the latest Adobe Creative Cloud applications. Many scripts work in CC 2018 and later, even some as far back as CS6, but may not perform as expected, or run at all, when used in versions prior to 2018. Photoshop features Select Subject and Preserve Details 2.0 definitely fail prior to CC 2018 (version 19) as the features do not exist in earlier versions. For best results use the latest versions of Adobe Creative Cloud applications.
IMPORTANT: by downloading any of the scripts on this page you agree that the software is provided without any warranty, express or implied. USE AT YOUR OWN RISK. Always make backups of important data.
IMPORTANT: fees paid for software products are the purchase of a non-exclusive license to use the software product and do not grant the purchaser any degree of ownership of the software code. Author of the intellectual property and copyright holder William Campbell retains 100% ownership of all code used in all software products regardless of the inspiration for the software product design or functionality.
