Page Dimensions
Script for Adobe InDesign
Latest update 12/7/2023, version 2.2
For a page or spread, or all, specify dimensions of live area, page size, spread (trim), and bleed. The script is a variation of Dimensions InDesign, modified to specify the dimensions of page areas rather than elements on the page.
- Specify any page area or all
- Position any side or all
- Dimensions added to pasteboard or on page
- Live area get from each page or use document setup for all
- Omit redundant dimensions
- Save and restore all settings
- User-configurable localization
FREE 30 DAY TRIAL
Single-user perpetual license
Pay once, no subscription,
use forever
How-to Video
How to use the script
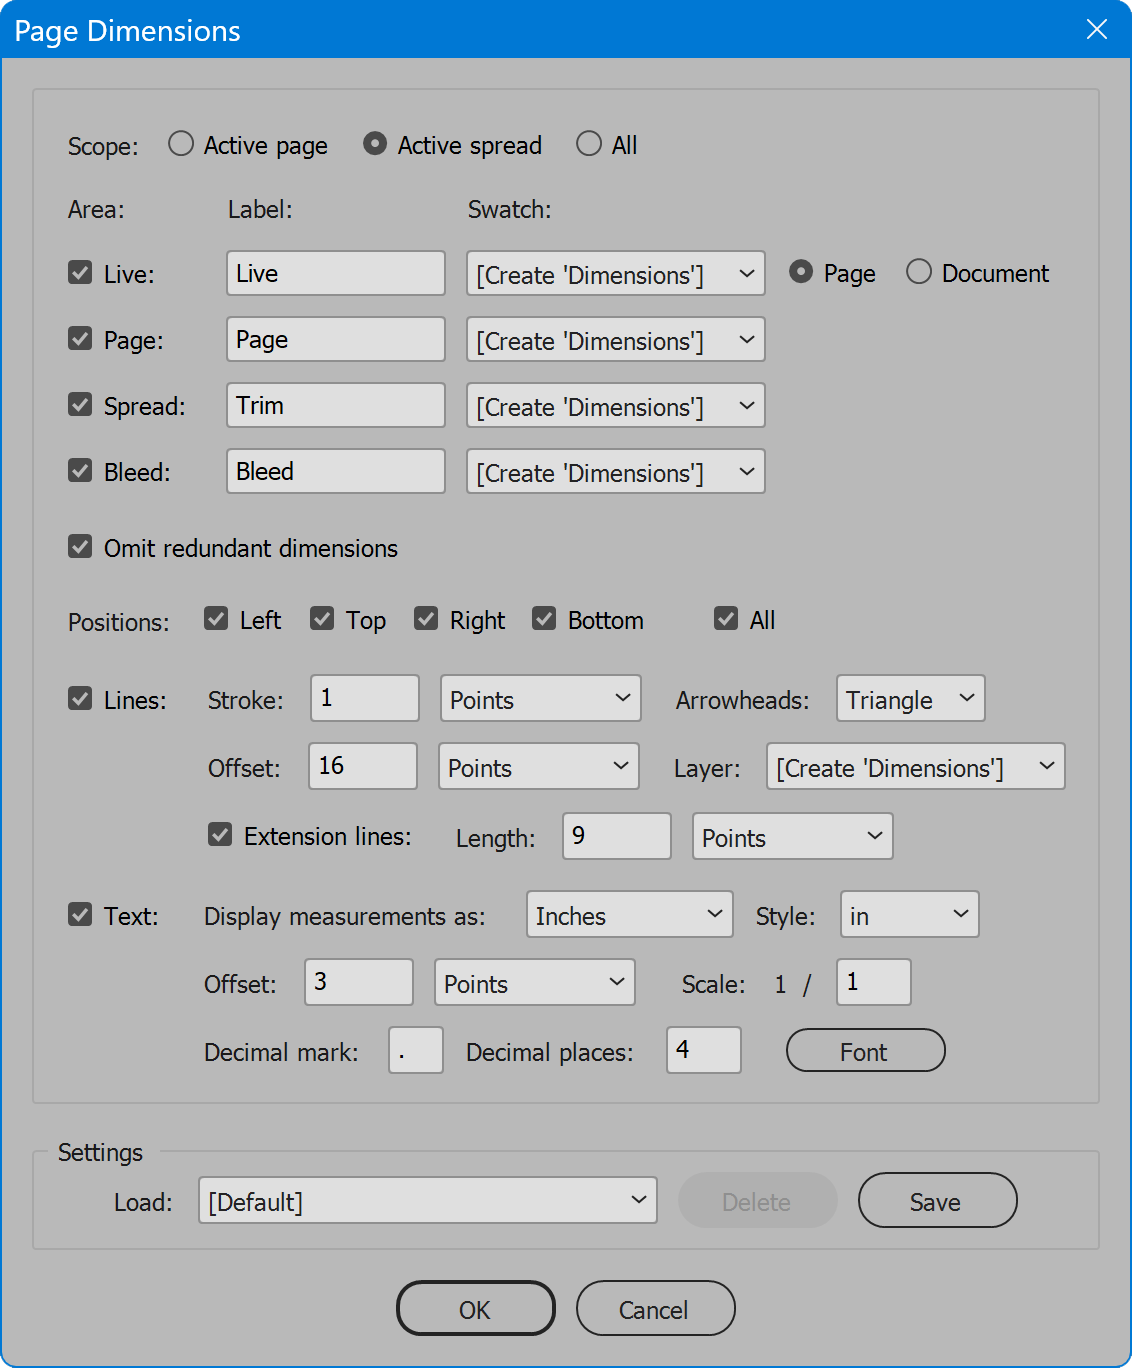
The interface has two sections. The first is all options. The second section is Settings, to save and restore options. Select the desired options and click the button OK to proceed, or Cancel to exit the script.
Section 1: Options
Scope — choose to specify dimensions of the Active page, Active spread, or All pages of every spread of the document. The definition of “active” depends on the level of zoom in the layout window, and can often be another page than expected. In the Pages panel, the active page and/or spread may or may not be signified by a blue overlay on the page icons. If all pages of a spread are selected and appear blue, it is unclear which is the active page. Usually it is the first page of the spread, but sometime the active page is whichever fills more of the view if magnified. To eliminate uncertainty and make a specific page active, double-click its icon in the Pages panel so that it alone has a blue overlay, rather than all pages of the spread.
The choices Active page and Active spread also apply to parent pages if one is the active page or spread, but the choice All adds dimensions to all document pages and spreads, and does not touch parent pages.
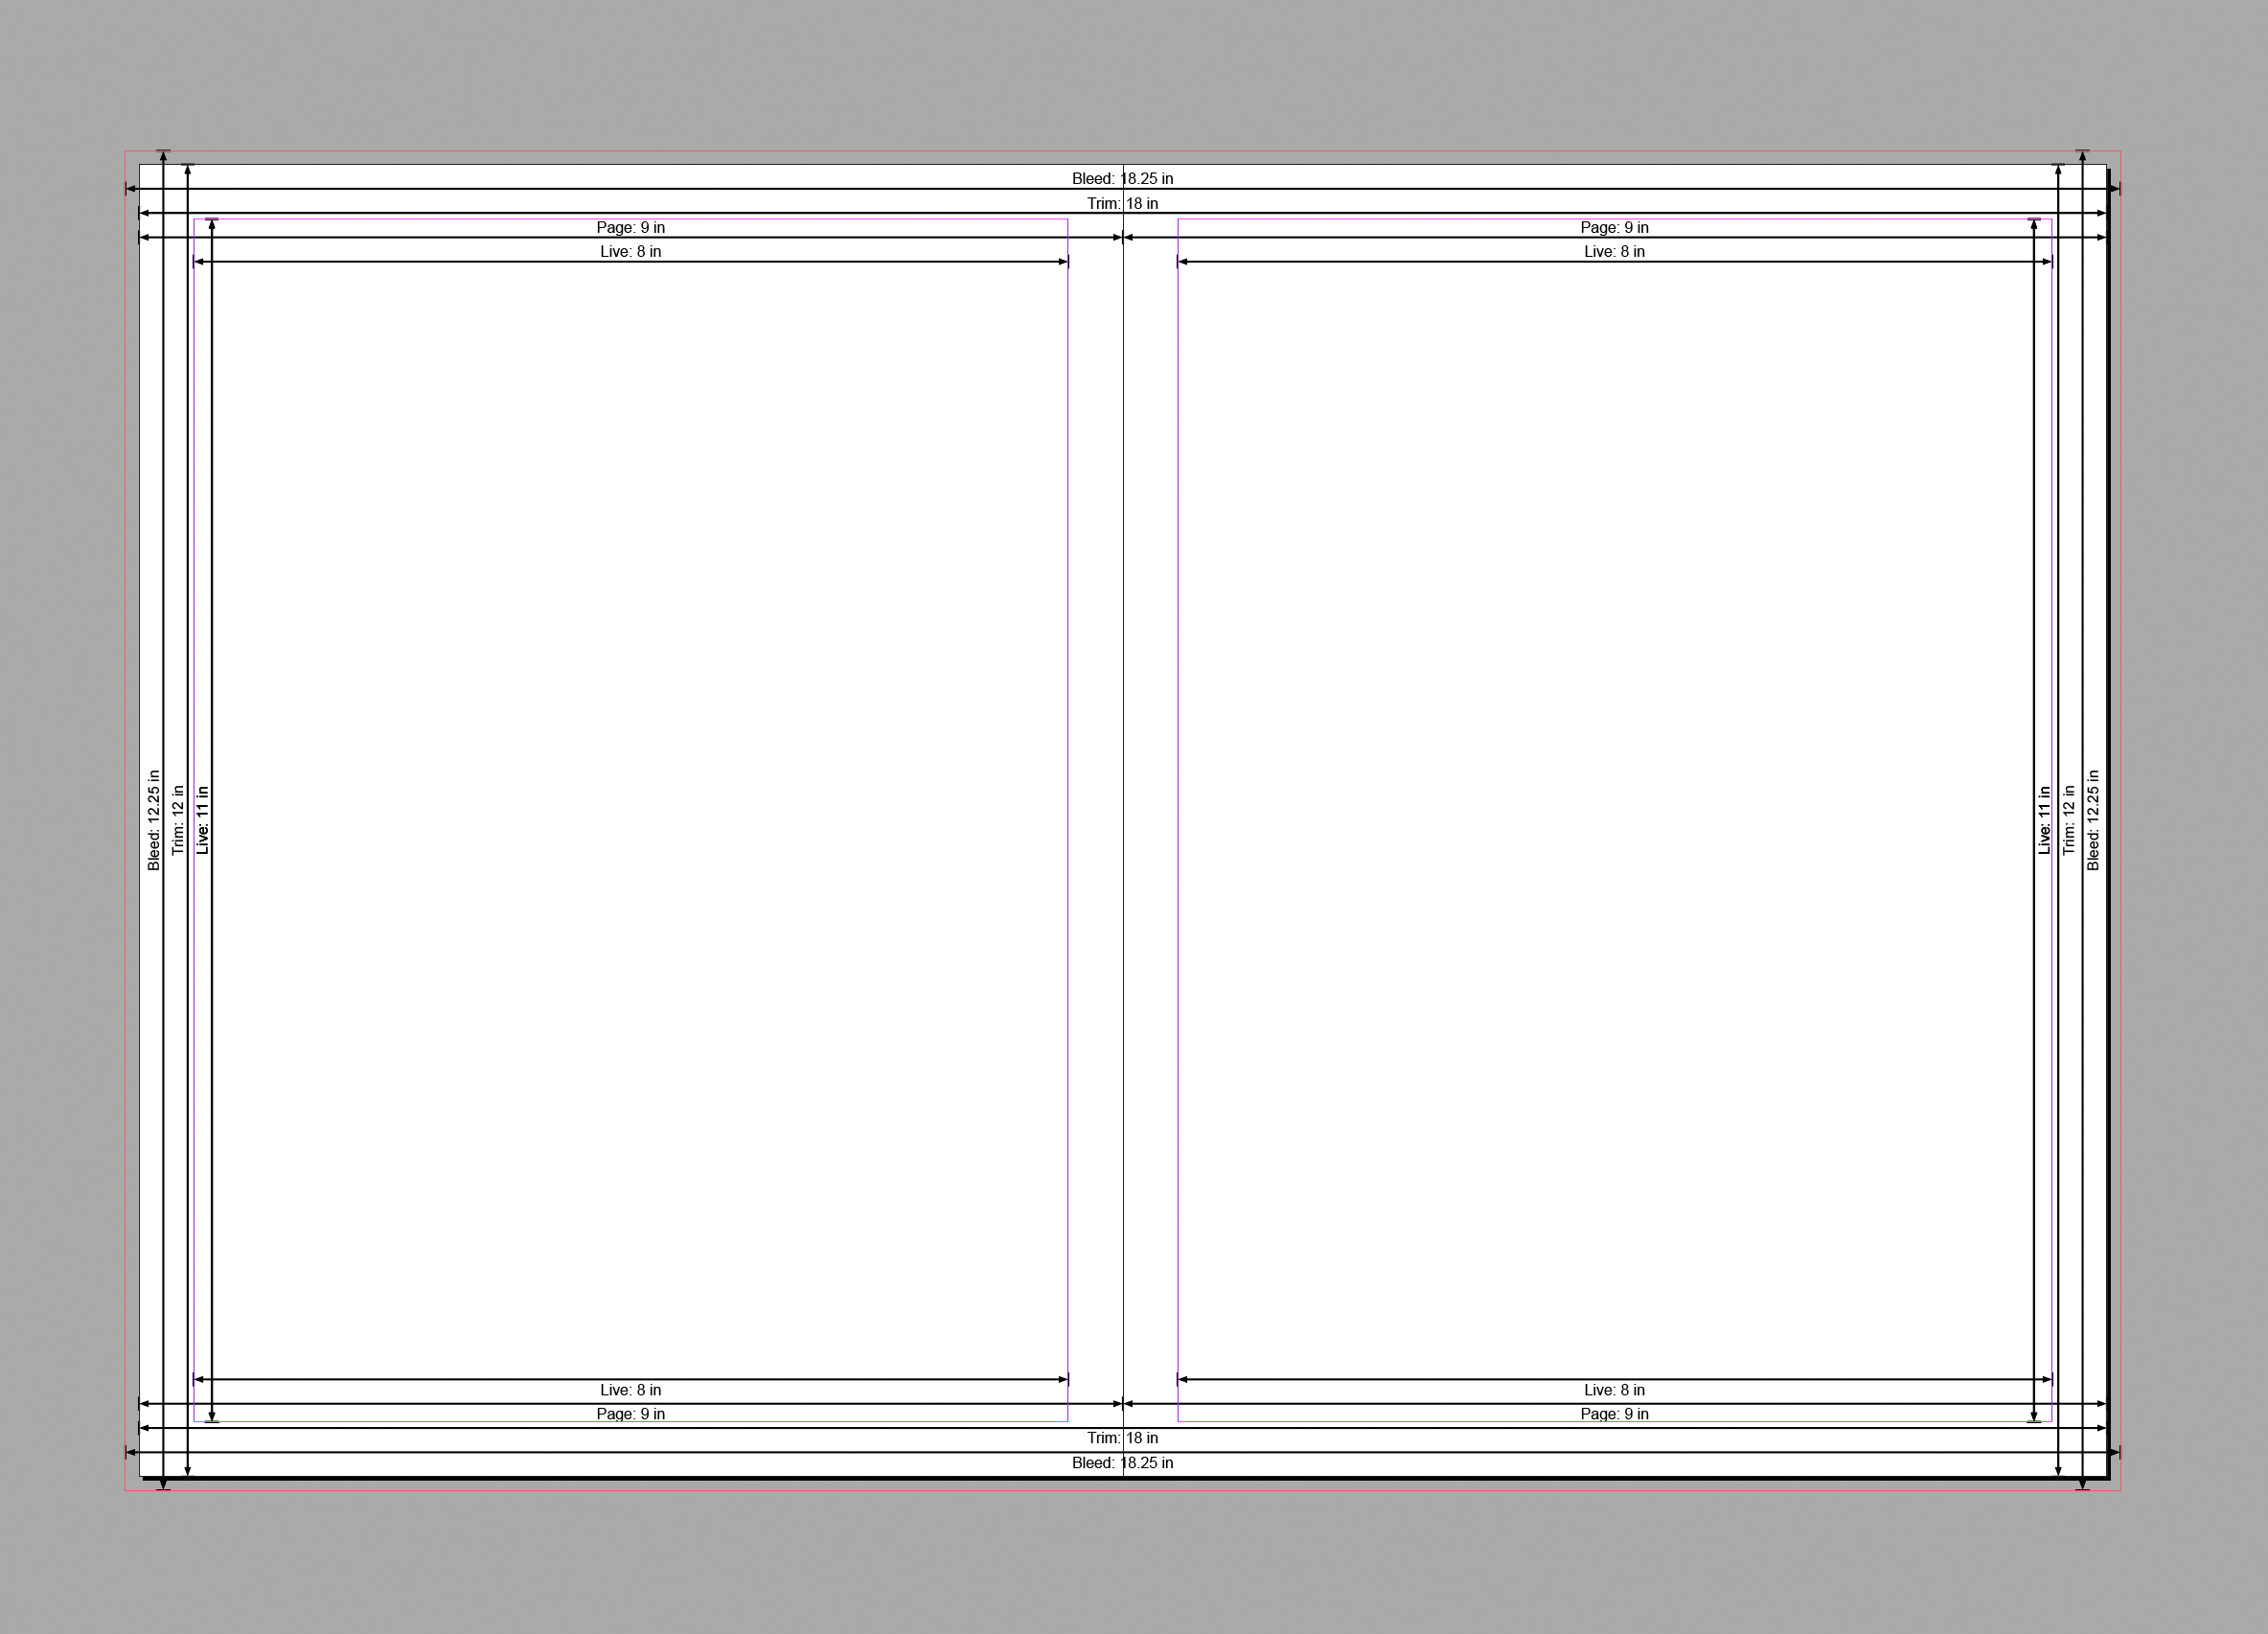
Area/Label/Swatch — there are four areas that dimensions may be specified. Enable the checkbox for each desired, then enter text for the label and choose a swatch to color the measurements. At least one area must be enabled.
Label — literal text that precedes the measurement value to describe what it represents.
Swatch — the swatch used to color each area’s dimension both lines and text. The drop-down list defaults to a swatch named ‘Dimensions’. If the swatch does not exist, the choice [Create 'Dimensions'] appears in the list. This choice creates the swatch. Otherwise choose an existing swatch. If you want each area a different color, create the swatches beforehand, and choose each accordingly.
Area Live — the area within the page margins. If the page (or document when the option Page/Document is set to Document) has margins set to zero, the measurement is redundant as it matches the page and/or spread (trim) size. If the areas Page or Spread are enabled and either size matches, the Live dimension is not drawn, unless the option Omit redundant dimensions is disabled.
Page/Document — choose whether live area is determined by the margins set for each page, or use margin values in Document Setup for all pages.
Area Page — the page size. When a spread is a single page, this dimension is redundant as it matches the spread (trim) size. If the area Spread is enabled and the spread is a single page, the Page dimension is not drawn, unless the option Omit redundant dimensions is disabled.
Area Spread (trim) — the spread size, which is also the trim size.
Area Bleed — the spread area plus the bleed value in Document Setup. If bleed is set to zero, the measurement is redundant as it matches the page and/or spread (trim) size. If the areas Page or Spread are enabled and either size matches, the Bleed dimension is not drawn, unless the option Omit redundant dimensions is disabled.
Omit redundant dimensions — when enabled, Live area is not drawn when it matches Page or Spread, Page area is not drawn when it matches Spread, and Bleed area is not drawn when it matches Page or Spread. The area Spread (trim) is always drawn unless disabled, in which case other dimensions that might otherwise be redundant are drawn.
Position — the edges that dimensions are added. Click the All checkbox to toggle all positions on or off. At least one position must be enabled.
Lines
Enable the checkbox to draw lines. If unchecked, the remaining Lines options are disabled.
Stroke — the width of strokes used to draw measurement lines and extension lines. Select the measurement units in the drop-down list.
Arrowheads — choose None, or choose from the four available options: Circle, Simple, Slash, or Triangle to include arrowheads at each end of the measurement lines. Arrowheads are added as space permits. For dimension lines of less length than the space required, arrowheads are not added.
When the Arrowheads drop-down-list is open, at the bottom is the choice Configure. Selecting this opens a new window to alter the appearance of arrowheads.
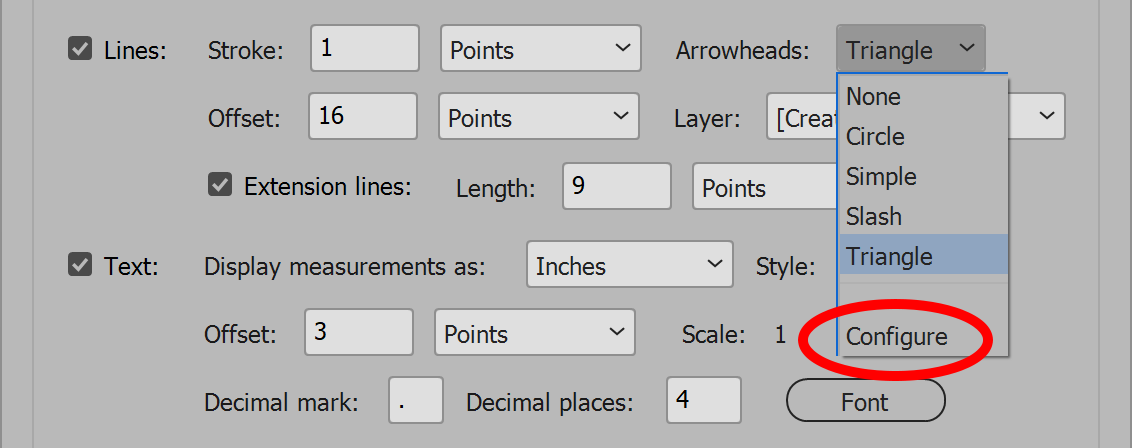
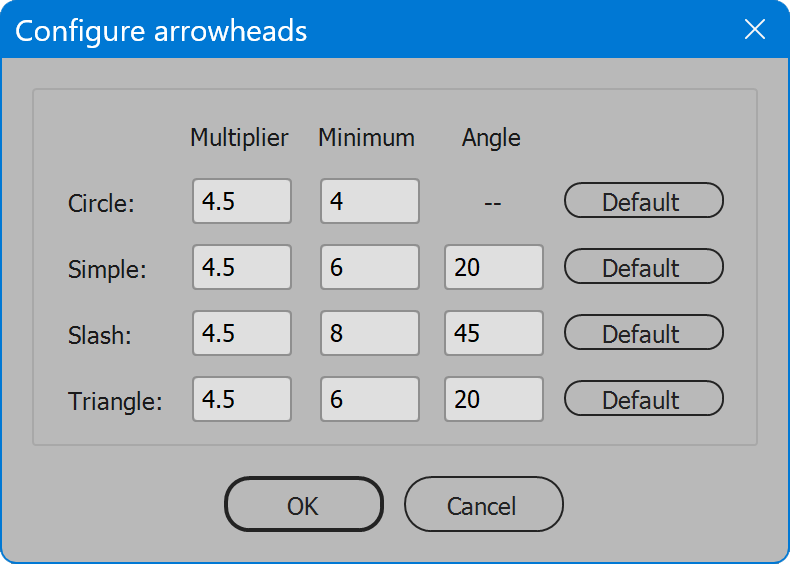
For each of the four arrowhead styles, there are three variables that determine each arrowhead’s appearance (with the exception of Circle, which has only two variables).
The size of each arrowhead is its multiplier times the line stroke weight, but not less than the minimum, which is the minimum size in points. For Simple and Triangle, the angle is degrees from the measurement line. Slash angle is degrees from extension line. Angle does not apply to Circle arrowheads. Also beside each row of inputs is a button Default, which restores the corresponding arrowhead to its default values.
Experiment with values to get the preferred appearance of each arrowhead. See the example below, Simple arrowhead set to 20 degrees angle (the default), and again set to 45 degrees.

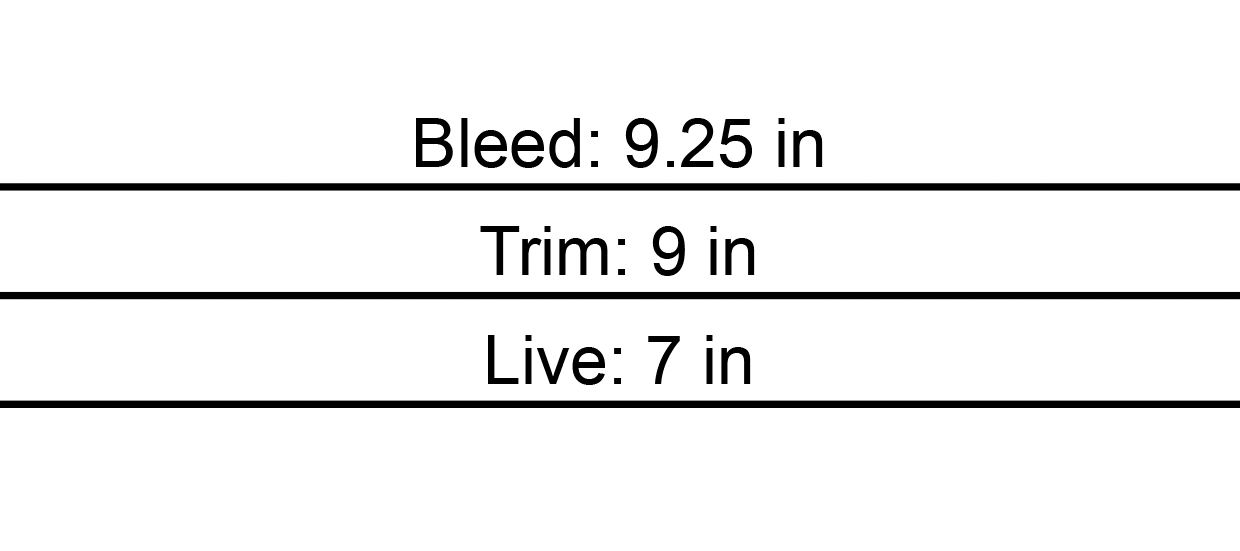
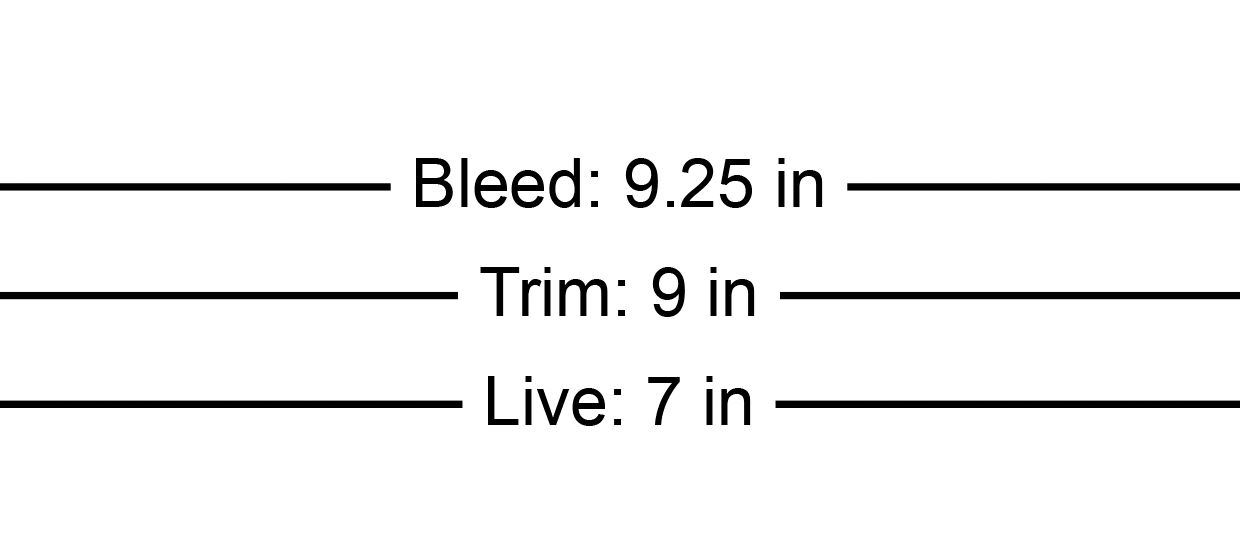
Offset — when a positive value, dimensions are added beyond the bleed area in the document slug area, in the order shown in the Area section of the interface. The value is the distance from the bleed, or prior dimension, that measurement lines are drawn. When the Offset value is negative, dimensions appear on pages instead, and the order drawn is reversed. The value is the distance from the page, or prior dimension, that measurement lines are drawn. Select the measurement units in the drop-down list.
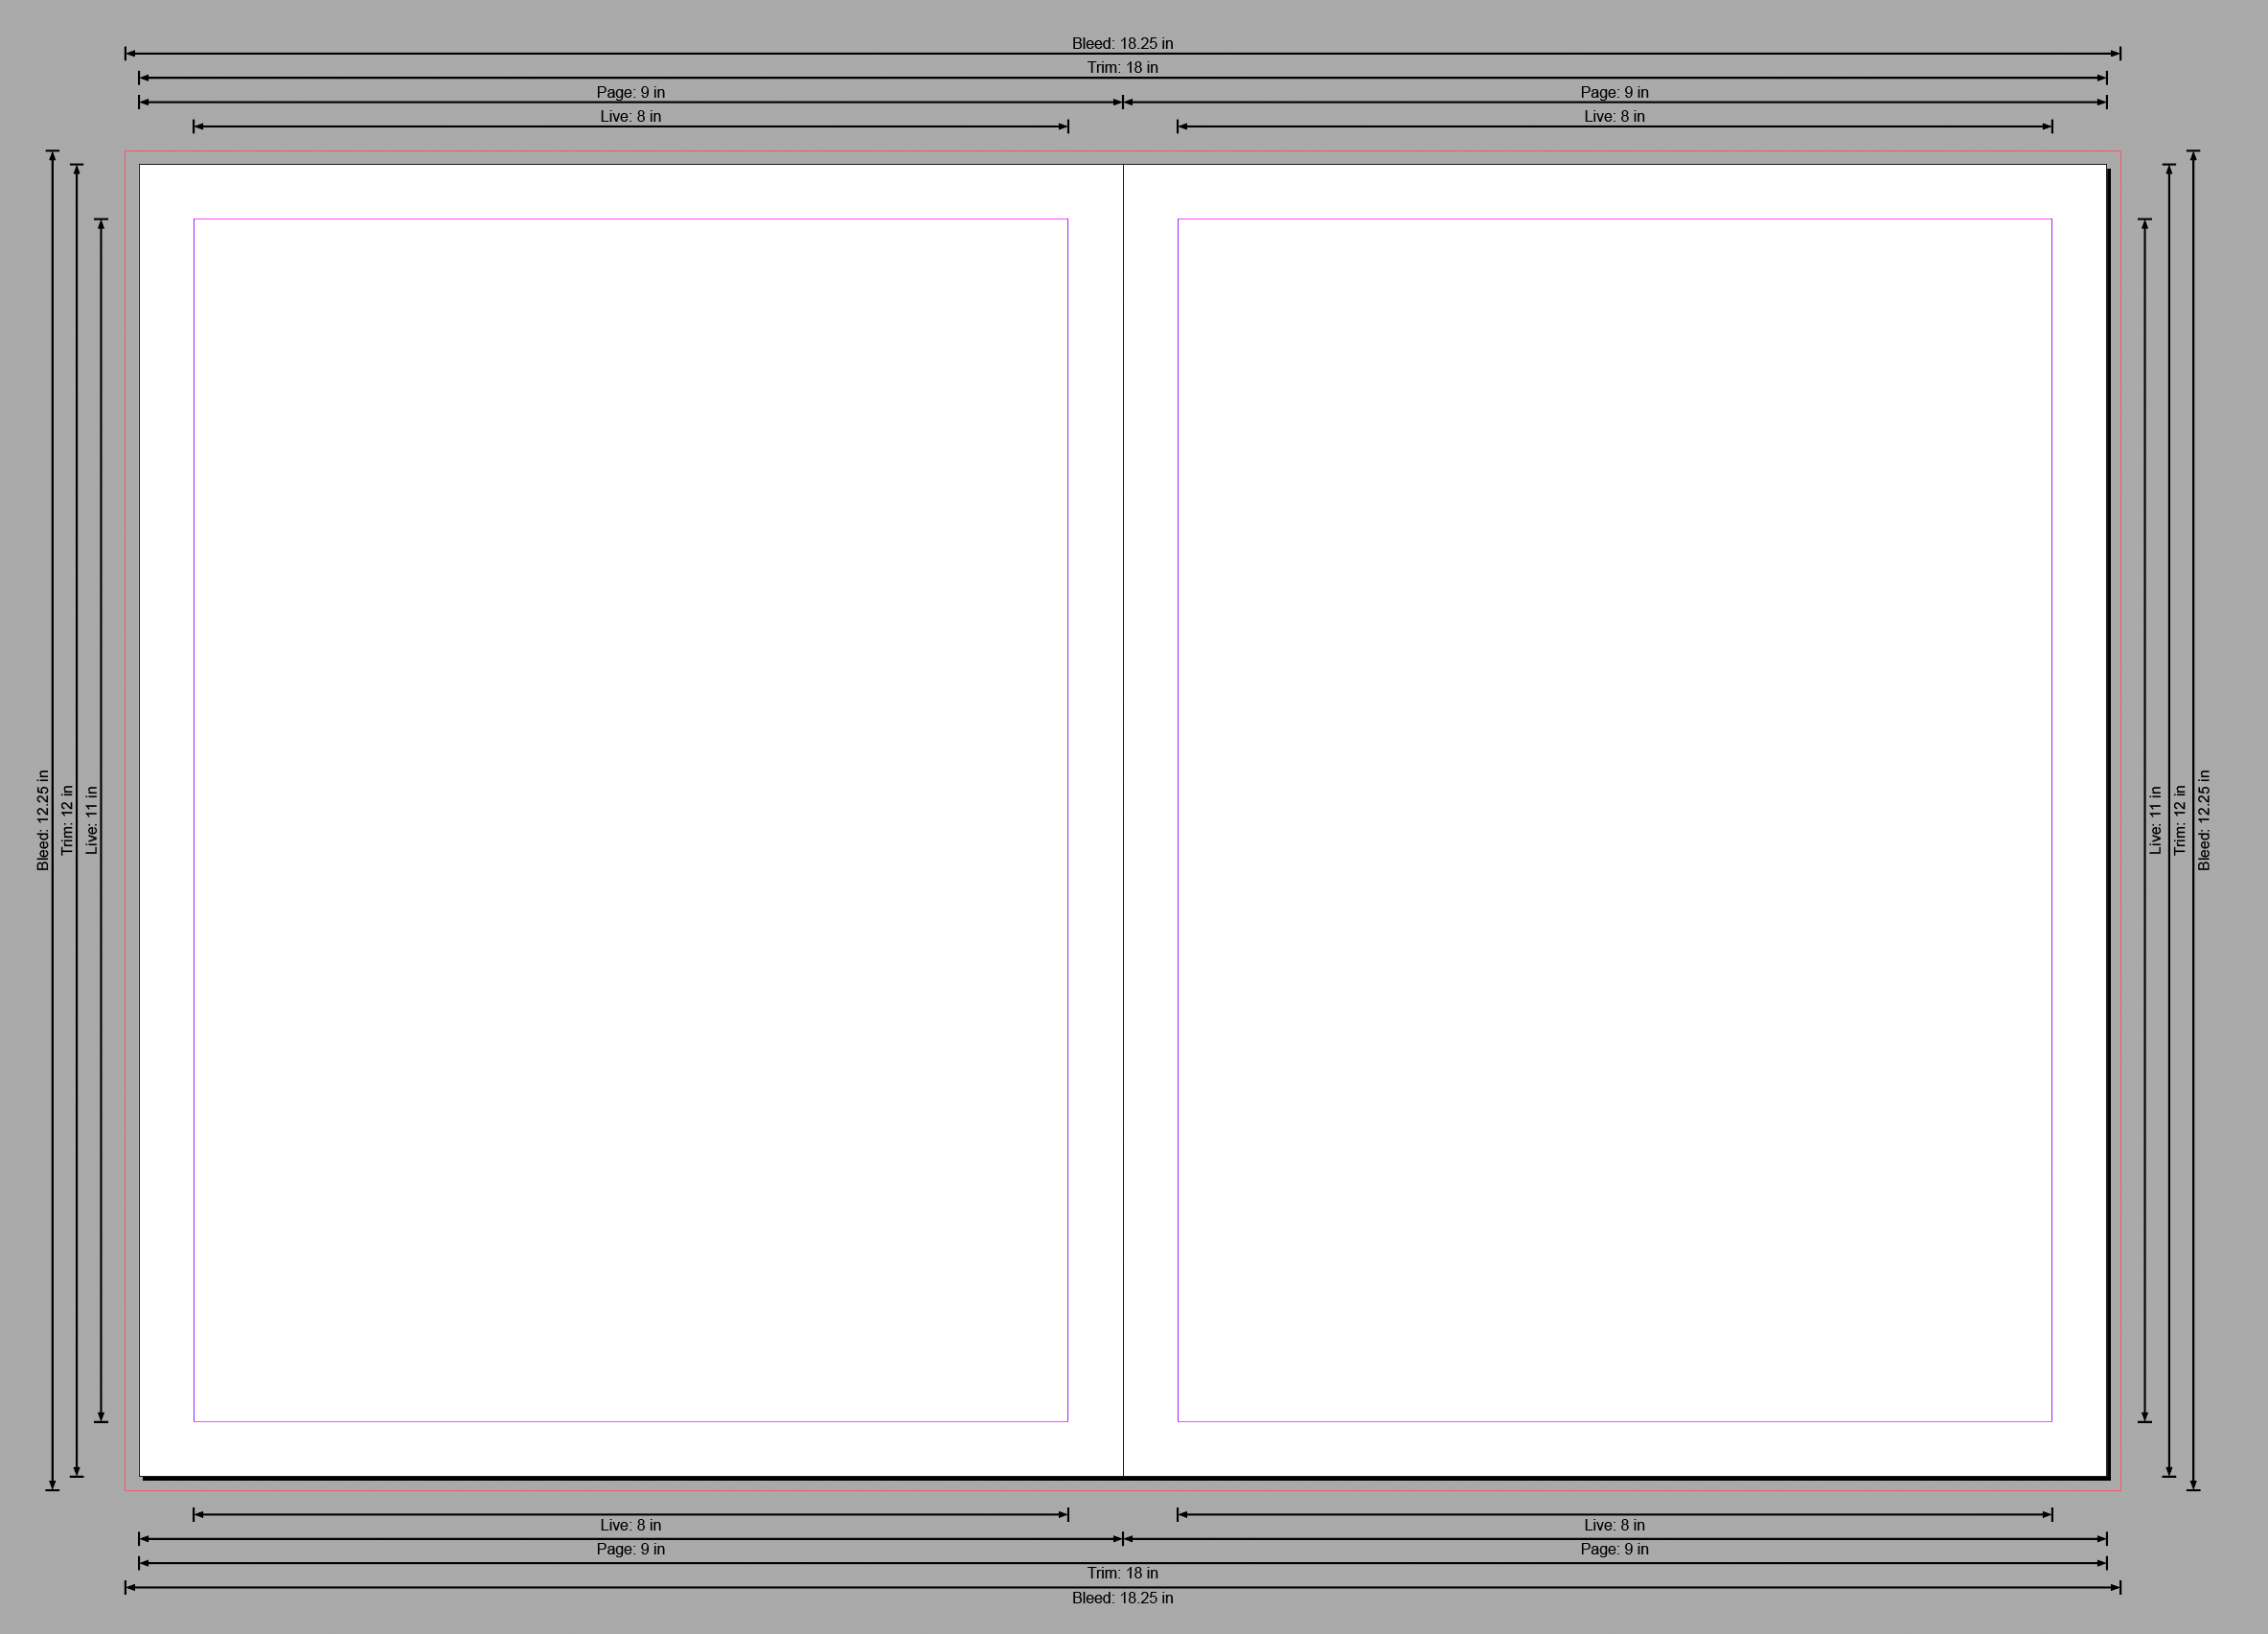
Page Dimensions positive offset
Page Dimensions negative offset
Layer — the layer to which dimensions are added. The drop-down list defaults to a layer named ‘Dimensions.’ If the layer does not exist, the choice [Create 'Dimensions'] appears in the list. This choice creates the layer. Otherwise choose an existing layer.
Extension Lines — enable to include extension lines at each end of the measurement line. When enabled, the length of extension lines may be set. Select the measurement units in the drop-down list.
Text
Enable the checkbox to draw text of the measurement value. If unchecked, the remaining Text options are disabled.
Display measurements as — the measurement units (inches, points, mm, etc.) that appear in text labels.
Style — how the measurement units are expressed. For example, Feet & Inches may display 6 ft 7 in, 6 ft. 7 in., 6 feet 7 inches, or 6' 7". The choices vary depending on the measurement units selected. There is also the choice “None” to omit any indication of the measurement units. However, to keep feet and inches from crashing together, a dash is inserted between them.
Offset — the distance from the measurement line to the text label for the measurement value. Select the measurement units in the drop-down list.
Normally text labels are drawn above, below, or to the side of the measurement line, depending on the position (left, top, etc.). When the value for text offset is negative, the script assumes the user wants the text value atop the measurement line. In this case the script fills the text frame with the swatch "Paper" and adds minimal inset spacing so the frame knocks-out the line below it.
Page Dimensions positive text offset
Page Dimensions negative text offset
Scale — a divisor that alters the value of text labels, for layouts not built to actual size. Set as desired, or use 1 / 1 for actual size.
Decimal mark — enter the desired character to separate the integer portion from the fractional portion of values in text labels, typically a period (dot, point), or comma.
Decimal places — the number of decimal places that appear in text labels when values are not whole numbers.
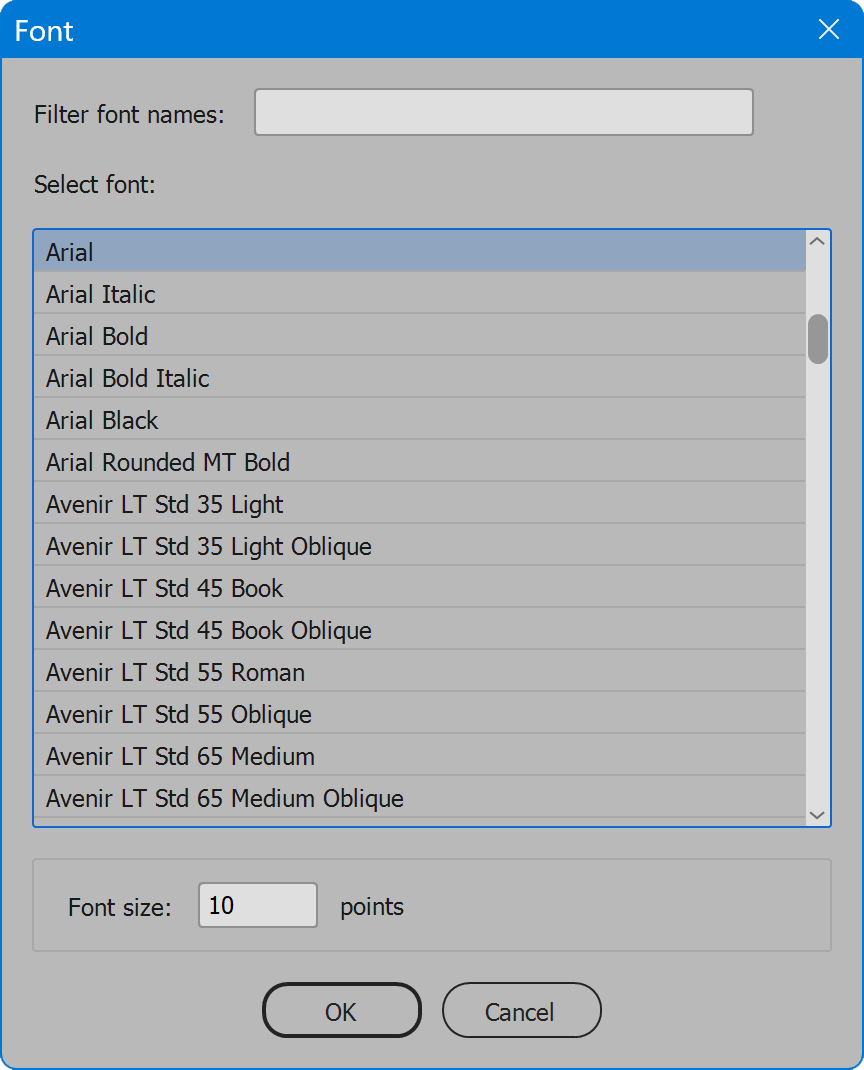
Font — opens a new window to set the font name and size used for the text of measurements. For long font lists, use the input field Filter font names to narrow the list to a specific name. Select the desired font in the list. Lower, enter the desired font size in points. Click OK when the font and size are set as desired, or Cancel to ignore any changes.
Section 3: Settings
The current options may be saved and restored later. Select from the Load drop-down list to choose saved settings, and the current options are updated. Click the Delete button, and the saved settings selected in the Load drop-down list are permanently removed. Click the Save button, provide a name for the settings, and the current options are preserved. If the name already exists, the user may choose to replace the saved settings. Or click the checkbox Replace settings, and choose the settings to replace.
The script provides default saved settings named [Default]. These settings cannot be deleted but may be updated to the current values. Save settings, click the checkbox Replace settings, and choose [Default].
Language
By default the script language is US English, which does not require further download or configuration. To have the script interface display other languages, choose from the available languages below. Download and copy the .i18n file to the script folder alongside the script. When launched, the script detects the language file and displays interface text in that language. If your language is not listed, download the English file and translate it. The file is plain text formatted as JSON, containing interface text in English, and a second value for its translation, which for the English file is the identical text. Copy the file and rename it to replace “en” with the relevant code for your language, then edit the file to change each line’s second value to the translation in your language. For more detailed instructions of how to edit and install i18n files, see How to Localize Scripts.
English: page-dimensions-en-i18n.zip
FREE 30 DAY TRIAL
Single-user perpetual license
Pay once, no subscription, use forever
Change log: page-dimensions.txt
For help installing scripts, see How to Install and Use Scripts in Adobe Creative Cloud Applications.
IMPORTANT: scripts are developed for the latest Adobe Creative Cloud applications. Many scripts work in CC 2018 and later, even some as far back as CS6, but may not perform as expected, or run at all, when used in versions prior to 2018. Photoshop features Select Subject and Preserve Details 2.0 definitely fail prior to CC 2018 (version 19) as the features do not exist in earlier versions. For best results use the latest versions of Adobe Creative Cloud applications.
IMPORTANT: by downloading any of the scripts on this page you agree that the software is provided without any warranty, express or implied. USE AT YOUR OWN RISK. Always make backups of important data.
IMPORTANT: fees paid for software products are the purchase of a non-exclusive license to use the software product and do not grant the purchaser any degree of ownership of the software code. Author of the intellectual property and copyright holder William Campbell retains 100% ownership of all code used in all software products regardless of the inspiration for the software product design or functionality.
