Printer Spreads
Script for Adobe InDesign
Latest update 4/25/2024, version 1.8
Arrange document pages into printer spreads.
- Overrides parent pages
- Clears pasteboard and all guides
- Merges all layers
- Merges all pages to a single section
FREE 30 DAY TRIAL
Single-user perpetual license
Pay once, no subscription,
use forever
How-to Video
How to use the script
There is no interface other than alert messages that may appear if the document does not meet the following requirements:
Facing pages — the document must be facing pages.
Page count — printer spreads require the document page count is divisible by 4. If not, the user is prompted with an option to add blank pages to the end of the document.
First and last spread — both first and last spread must be a single page.
If the requirements are met, the script proceeds. The following steps are completed:
- Everything is unlocked including guides.
- All guides are removed.
- Items on the pasteboard are removed.
- Parent page items are overridden, and all parent page items are removed.
- Text markers 'Current Page Number' are resolved to their actual value.
- Layers are merged to a single layer.
- Sections are collapsed to a single section.
- Margins are set to zero and rulers are reset to page origin.
- First and last pages are adjusted so that no elements extend beyond the spine edge.
- Crossover elements that span spread pages are divided onto the pages where the elements appear.
- Page order is rearranged to create nested saddle stitch 4-page signatures that tuck inside one another and are bound at the spine, typically with a pair of staples. The last page is paired with the first (back and front cover), and pages to follow are arranged increasing low folio pages paired with decreasing high folio pages.
- For each spread, elements are grouped, page size is doubled, and the group is put back to its original position.
- The leftover empty pages are removed.
- Excess parent pages are removed, and all pages are assigned the one remaining parent page.
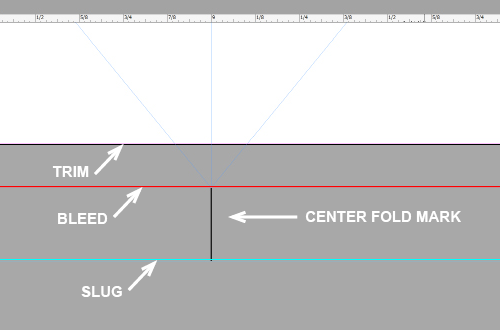
- A center guide and fold marks are added to the parent page.
The result is a document half the number of single pages that are double the width of the trim size, with two pages side-by-side as a spread across each document page.
Important note when exporting PDF
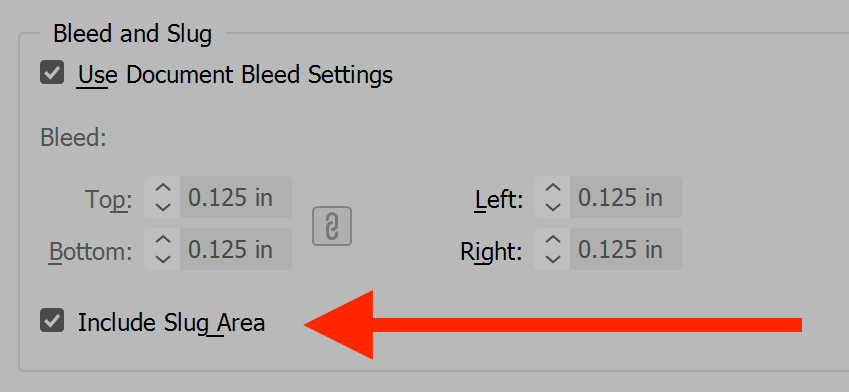
The script adds center fold marks off each page in the slug area, which the script sets to 24 points. For these fold marks to appear on exported PDFs, ensure that in the PDF Export Options, section “Marks and Bleeds”, the option “Include Slug Area” is enabled. Otherwise, because the marks are beyond bleed, they do not appear.
FREE 30 DAY TRIAL
Single-user perpetual license
Pay once, no subscription, use forever
Change log: printer-spreads.txt
For help installing scripts, see How to Install and Use Scripts in Adobe Creative Cloud Applications.
IMPORTANT: scripts are developed for the latest Adobe Creative Cloud applications. Many scripts work in CC 2018 and later, even some as far back as CS6, but may not perform as expected, or run at all, when used in versions prior to 2018. Photoshop features Select Subject and Preserve Details 2.0 definitely fail prior to CC 2018 (version 19) as the features do not exist in earlier versions. For best results use the latest versions of Adobe Creative Cloud applications.
IMPORTANT: by downloading any of the scripts on this page you agree that the software is provided without any warranty, express or implied. USE AT YOUR OWN RISK. Always make backups of important data.
IMPORTANT: fees paid for software products are the purchase of a non-exclusive license to use the software product and do not grant the purchaser any degree of ownership of the software code. Author of the intellectual property and copyright holder William Campbell retains 100% ownership of all code used in all software products regardless of the inspiration for the software product design or functionality.
