Variable Images From CSV
Script for Adobe Photoshop
Latest update 5/16/2024, version 4.2
The script reads a CSV spreadsheet of multiple image names and text, and for each row of data, updates layer names that match column heads to the image or text specified. Then each unique result is output in the selected file format. Simplify data-driven graphics in Photoshop with batch processing and variable data sets rolled into one solution.
- Combine images and text for personalized images
- Update any number of image and text layers
- Specify URLs to download image and import to layer
- Output formats BMP, JPG, PNG, PSD, or TIF
- An easier way to accomplish data merge in Photoshop
- Recognizes column for output file name
To process multiple templates and/or data files, and other advanced features, see Variable Images Advanced.
FREE 30 DAY TRIAL
Single-user perpetual license
Pay once, no subscription,
use forever
How-to Video
NOTE: after video production, features have been added in response to user feedback: image placement options; layer visibility control; fit content to text area; image placement and alignment overrides; update solid color and shape layer color values. See instructions below for details.
Before using the script
Using the script requires preparation. First is a template image with specific layer names.
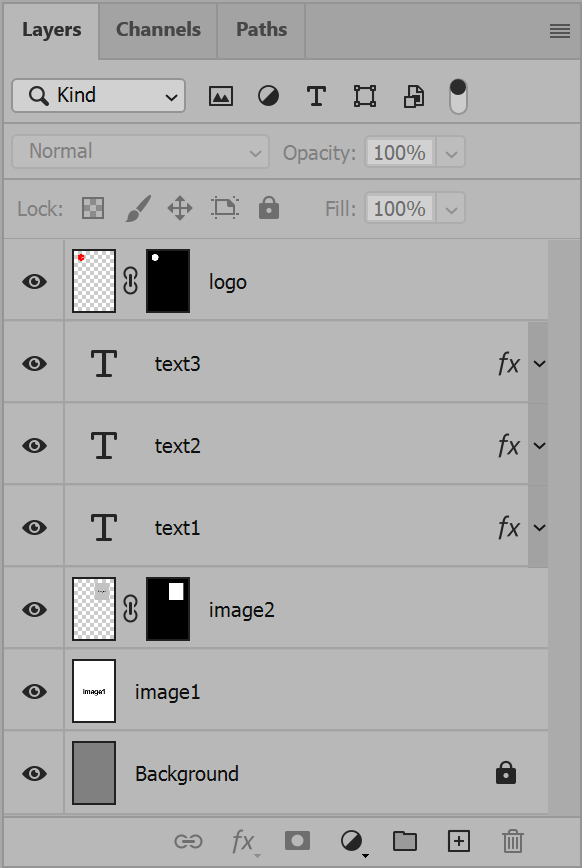

This example is two normal pixel layers, “image1” and “image2”, then three text layers, “text1”, “text2”, and “text3”. And one final normal pixel layer “logo”. Pixel layers may be masked as are layers “image2” and “logo” in this example.
The number of layers to update is limited only by the resources available to Photoshop. Layers may exist that are not updated. For example, elements common to all images output. Any layer name that does not appear in the spreadsheet is untouched and, if visible, is included with all images output.
The second item to prepare is a spreadsheet of image file names and text. The column heads must match layer names in the template image. This tells the script what goes where. If column heads exist that have no matching layer in the template image, the columns are ignored.

In this example, rows of the column “image1” are image file names to import and update the layer named “image1” of the template image. Rows of the column “text1” replace the text contents of the layer named “text1”.
And so on with all layer names and column heads present in both the template and data. When the template image contains multiple layers of the same name, all are updated with the content specified in the data for the layer name.
Columns for images may be the full path to the file, a URL to download the file, or the file name only. If file name only, select the folder to search for images in the section Images. It is possible to mix image names that are full paths and/or URLs with images that are file name only. See the section Further reading for more details.
Colors
It is possible to update the color value of any solid color fill layer or shape layer.
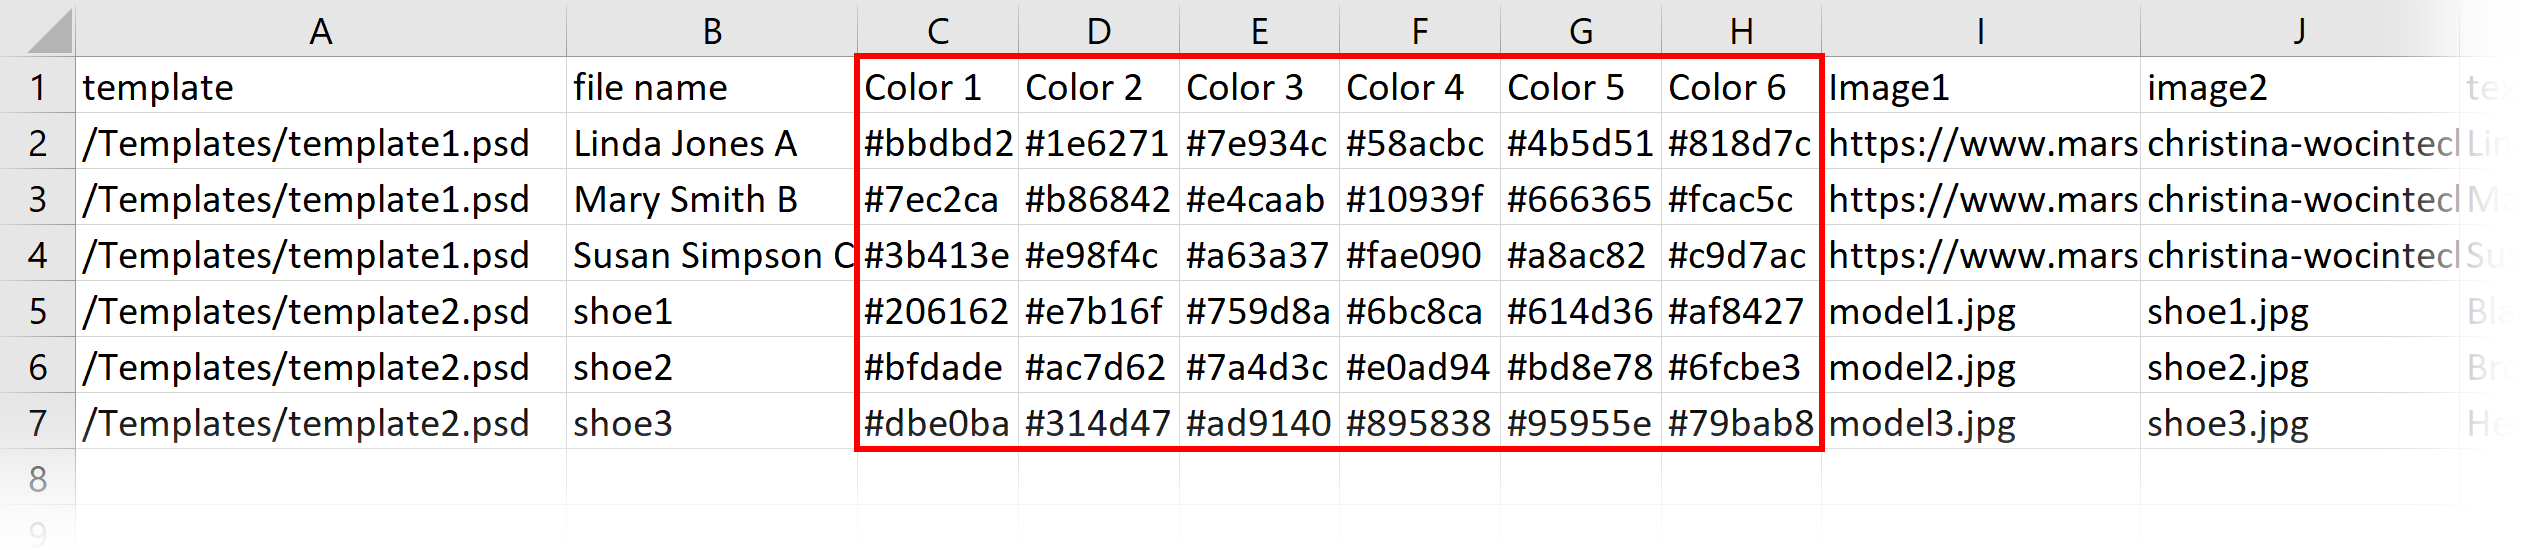
The same as image and text layers, in the column head list the layer name. Then in rows below list the desired color values in hex format. For example “#ef33b6”. The hash symbol is optional.
Each layer that matches the name in the column head, and is the right type of layer to accept color values, is updated to the specified color value.
Layer visibility
To control layer visibility, add a column labeled the layer name, a colon, then followed by “visible”, or “visibility”. Do not add spaces either side of the colon. In each row, indicate whether the layer should be visible. Use any one of the following that you prefer: yes, true, show, or visible. Any one present makes the layer visible. To hide the layer, use any one of the following: no, false, hide, or invisible. Then the layer visibility is disabled. If the cell for any row is empty or has other content, the layer visibility remains untouched.

The layer identified by the column head is made visible or not. If the layer is within a group or groups, the parent groups of the layer are not touched. If any are not visible, the layer will not be visible. Ensure parent groups that may display content are visible in the template image. The best approach is have all layers visible in the template image that belong in all images output. Disable visibility for all optional layers, but keep visible any groups they are within. Then let the data and script make visible only the layers desired for each image output.
Columns for layer visibility are independent of columns for layer content either image or text. Columns for content may be present without any for the layer’s visibility, and likewise, a visibility column my exist for any layer with or without a content column for the same layer. Neither depends on the other.
File name
There is one special column head that is optional and not related to any layer name. Use the column head “file name” to indicate the output file name, which is then saved in the selected output folder. Do not include an extension. The script adds the extension based on the output format chosen. If this column is absent, the first image name or text value found is used to name the output file.
Overrides
By default, images are centered unless the image placement option is set to Match, which positions the image to match the template placeholder. For text layers, alignment is defined by the paragraph alignment set for the layer. The options for image placement apply to all columns and rows of the CSV data.
The “overrides” feature allows the user to force any cell, or an entire column, to differ from the defaults. For example, an image may be aligned to the left or to the right of the canvas or mask instead of centered. Text may be aligned differently from the alignment defined by the layer. The image placement options (fill, fit, etc.) may differ for an entire column, or a single or multiple cells.
There are two kinds of overrides. First, a column override that is added to the column head and applies to every row under the column. The second override is more specific that applies to a single cell. It is possible to have a column override and one or more cell overrides below it that apply only to those rows. All the other rows follow the column override.
To override a column, after its name in the header row, add the carrot character "^" (shift-6) followed by the desired override, listed below. Do not add any space characters after the column name and before the override, or after the override, or the override will fail. To override a cell, add the override after the content of the cell, or each cell if multiple cells. There is no limit of how many columns or cells may have overrides.
The available overrides are:
- Alignment (image): ^left ^right ^top ^bottom
- Alignment (text): ^left ^center ^right
- Image placement: ^fill ^fit ^stretch ^match
Column or cell overrides may have more than one override. For example, an image column or cell may include ^left^top^fit to align to the left and top of the canvas or mask, and scale using the fit option rather than the selection in the script interface. Do not add space characters between overrides or they will fail. Cell overrides take precedence over column overrides. If a column has ^left but a cell below it has ^right, the alignment is right. If a column or cell has multiple overrides that conflict, for example ^left^right, the last takes precedence. In this case, right.
Save as CSV
Once the spreadsheet is ready, save it as Comma Separated Values (CSV format). From Excel, choose Save As, and in the drop-down list Save as type, select CSV UTF-8 Comma delimited. UTF-8 is recommended so any Unicode characters are preserved.
How to use the script
With the template image open, run the script.
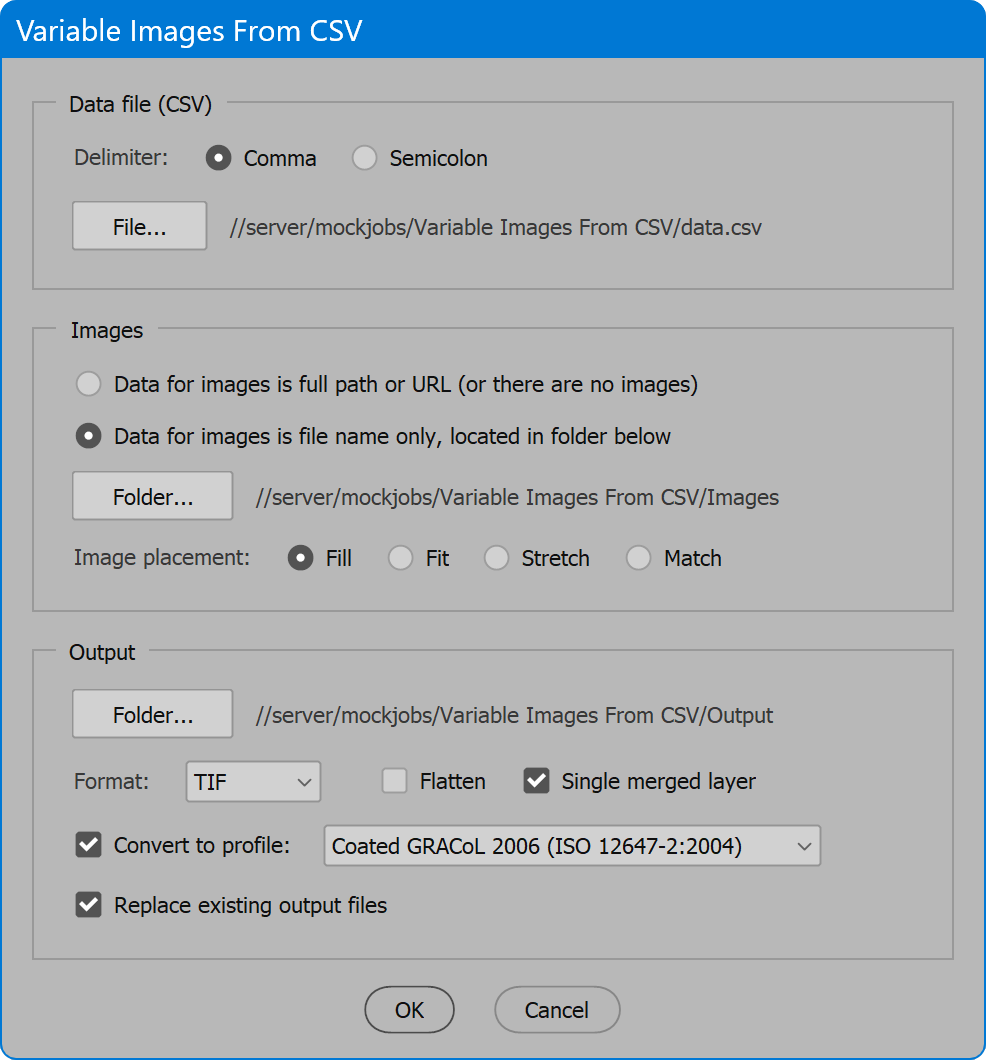
The interface has four sections: Data file, Images, Options and Output. Select the desired options and click the OK button to begin. If any problems occur, a log file is written in the output folder, and the user is notified.
Section 1: Data file (CSV)
Delimiter — the character that separates columns of the data file. The default is comma, normal in the United States. Some European countries use semicolon rather than comma. Select the delimiter used in your region of the world.
File — select the CSV data file.
Section 2: Images
Data for images is full path or URL (or there are no images) — when image columns in the data are full paths to images or URLs, there is no need to select a folder where they are located. Likewise, if the data is only text to update, a location to search for images is irrelevant. In these cases, choose this option, and the Folder button is disabled.
Data for images is the file name only, located in folder below — without a full path to images, the location to search for them is needed. Use the Folder button to select a location.
Folder — select a folder to search for images. The script processes each image file in the spreadsheet data that matches a file found in this folder.
Section 3: Options
Image placement — determines how imported images are scaled and cropped. The options Fill, Fit, and Stretch center the replacement image relative to the canvas or layer mask, if one is applied to the layer.
Fill — scales the image so its shortest dimension reaches the canvas or mask boundary and crops out any portion that exceeds the boundary while maintaining proportions.
Fit — scales the image so its longest dimension reaches the canvas or mask boundary and none of the image is cropped while maintaining proportions.
Stretch — scales the image non-proportionally so that both dimensions fit the canvas or mask.
For imported images that match the aspect ratio of the canvas or mask, the image is scaled precisely to the canvas or mask size, and these options have no effect.
Match — best for templates using Smart Object layers with placeholder images. After replacing the image, the Smart Object layer is scaled to match the original size of the layer in the main document. Then the layer is positioned to match the top-left corner of the original layer. For this reason, the aspect ratio of each replacement image should match the placeholder image. Resolution or ultimate size may vary, but aspect ratio should not or the result is non-proportional.
Fit content to text area — enable to adjust the size or width of imported text that exceeds the space for it, given the font size assigned to the text layer in the template document. IMPORTANT: This only applies to text items defined as “text area”, the result of dragging with the mouse to create a rectangle that contains the text, as opposed to single-line text, the result of clicking instead of dragging. Ensure text to auto-adjust uses text area, not single-line text.
Reduce font size — gradually decreases the text layer font size until the new text fits the text area width.
Reduce font width — gradually decreases the text layer font horizontal scale, or width, while maintaining its height, until the new text fits the text area width.
Section 4: Output
Folder — select the location to which images are output.
Format — select the file format to output. Choices are BMP, JPG, PNG, PSD, or TIF.
Flatten — the result is a single “Background” layer. BMP and JPG always perform this step.
Single merged layer — applies to formats PNG, PSD, and TIF. When enabled, hidden layers are discarded, and the remaining layers are merged to a single layer. If a layer mask remains, it is applied. PNG does not support multiple layers, so this step always occurs if not flattened. The option does not apply to BMP or JPG as both do not support transparency and must be flattened.
The options Flatten and Single merged layer are mutually exclusive. Choose one or the other, or neither. The script does not allow both.
Quality — applies to JPG format only. Valid range is from 0 to 12. 0 is extreme compression resulting in low quality. 12 is light compression that is virtually indistinguishable from the original, the highest possible quality, which of course, results in the largest file size. 10 to 12 is recommended for print or other high-quality reproduction. For web images, 5 to 8 is an acceptable range.
Convert to profile — converts color to the selected profile prior to output.
Replace existing output files — when enabled, existing output files are replaced. When disabled and a file of the same name exists, the text “copy” is appended to the file name to prevent overwriting the existing file. If needed, additional version numbers are added, for example “copy 2”, “copy 3”, etc.
Further reading
If you’ve reached this point, you know enough to use the script. The remainder is not crucial to read, but it helps understand how the script works. This section is last, in the interest of minimizing “Too Long; Didn’t Read” (TL;DR).
All image layers are converted to smart objects, then the layer contents are updated. If the layer is a normal pixel layer and effects are applied, the effects are copied and pasted back to the layer after converted to a smart object. For layers already smart objects, any layer effects remain.
For text layers, the contents are replaced, and any layer effects remain. If the text content might span multiple lines, use a text area rather than single line to define the placeholder. Do this by dragging the cursor to define the text area rather than simply click, which limits text to a single line. Using a text area is preferred because it adapts to single or multiple lines of content as needed. Single line text placeholders do not.
At this time, the replacement of text on a path is unreliable due to a bug in Photoshop that shifts the path position when altered by ExtendScript.
Regarding image full path versus file name only. It is possible to mix full paths, URLs, and file names only in the data file. Use the option Data for images is the file name only, and select a folder to search for images. Images that are file name only work as expected. Images that are full paths of course fail once prefixed with the path to the images folder, but the script doesn't immediately give up. Instead, the script tests if a file exists without the images folder prefixed. If a file is found, the script uses it and adds an alert to the log file. Images that begin with http are considered URLs and are not altered. The image is downloaded to the output folder, imported into the template, then deleted.
It is the responsibility of the user to ensure column heads match the correct kind of layer in the template image. If a column for file names matches the name of a text layer, the text content is updated to the file name. If a column for text matches the name of a pixel layer, the script reports “File not found” in the log, unless somehow, however unlikely, the text matches the name of a file in the images folder.
Converting color requires the image is flattened or merged to a single layer because the possibility of adjustment layers, which cannot change color space and maintain faithful results. For this reason, when Convert to profile is enabled, the script ensures either Flatten or Single merged layer is enabled.
TIP: Converting to another profile is primarily to make CMYK separations for print, which of course is functionality the script provides. But as well, this option can convert duotones to RGB or CMYK, or convert these and other color spaces to grayscale (use the profile Dot Gain 20%).
The formats JPG, PSD, and TIF always embed color profiles. BMP and PNG never embed color profiles.
Available color profiles
For the option Convert to profile, the list of profiles from which to choose is compiled by searching known locations in the system for .icc/.icm files and extracting the profile name. This occurs each time the script is launched. The list should include most of the same profiles Photoshop displays in dialogs such as Color Settings, but it doesn’t match exactly. If a needed profile does not appear in the list, add the profile to a location both Photoshop and the script look for profiles (below), and relaunch the script.
macOS
:Library:ColorSync:Profiles
Windows
\Windows\System32\spool\drivers\color
Language
By default the script language is US English, which does not require further download or configuration. To have the script interface display other languages, choose from the available languages below. Download and copy the .i18n file to the script folder alongside the script. When launched, the script detects the language file and displays interface text in that language. If your language is not listed, download the English file and translate it. The file is plain text formatted as JSON, containing interface text in English, and a second value for its translation, which for the English file is the identical text. Copy the file and rename it to replace “en” with the relevant code for your language, then edit the file to change each line’s second value to the translation in your language. For more detailed instructions of how to edit and install i18n files, see How to Localize Scripts.
English: variable-images-from-csv-en-i18n.zip
FREE 30 DAY TRIAL
Single-user perpetual license
Pay once, no subscription, use forever
Change log: variable-images-from-csv.txt
For help installing scripts, see How to Install and Use Scripts in Adobe Creative Cloud Applications.
IMPORTANT: scripts are developed for the latest Adobe Creative Cloud applications. Many scripts work in CC 2018 and later, even some as far back as CS6, but may not perform as expected, or run at all, when used in versions prior to 2018. Photoshop features Select Subject and Preserve Details 2.0 definitely fail prior to CC 2018 (version 19) as the features do not exist in earlier versions. For best results use the latest versions of Adobe Creative Cloud applications.
IMPORTANT: by downloading any of the scripts on this page you agree that the software is provided without any warranty, express or implied. USE AT YOUR OWN RISK. Always make backups of important data.
IMPORTANT: fees paid for software products are the purchase of a non-exclusive license to use the software product and do not grant the purchaser any degree of ownership of the software code. Author of the intellectual property and copyright holder William Campbell retains 100% ownership of all code used in all software products regardless of the inspiration for the software product design or functionality.
