Varnish Maker
Script for Adobe InDesign
Latest update 12/17/2023, version 4.3
The script provides the means, via a floating palette, to create varnish elements for the current selection, the entire page, or the entire spread. Each element is created on the specified varnish layer, the fill color is assigned the specified varnish swatch, and the fill is set to overprint. The script is capable of creating varnish for an entire document, but to save time, consider first running the related script Varnish Images, which creates varnish for all images in the document in a single operation. Then this script may be used to create varnish for remaining non-image elements, as desired.
- Varnish selection, page, or spread
- Recognizes images masked using clipping paths
- Recognizes images masked using transparency
- Create varnish version of images if needed
- Varnish text
- User-configurable localization
Varnish Maker
How-to Video
How to use the script
The script presents two interfaces. First is a window of available options, which is closed once choices are set and the OK button is clicked. Then the second interface is displayed, a floating palette that remains on screen while moving through the document.
Interface 1: Options
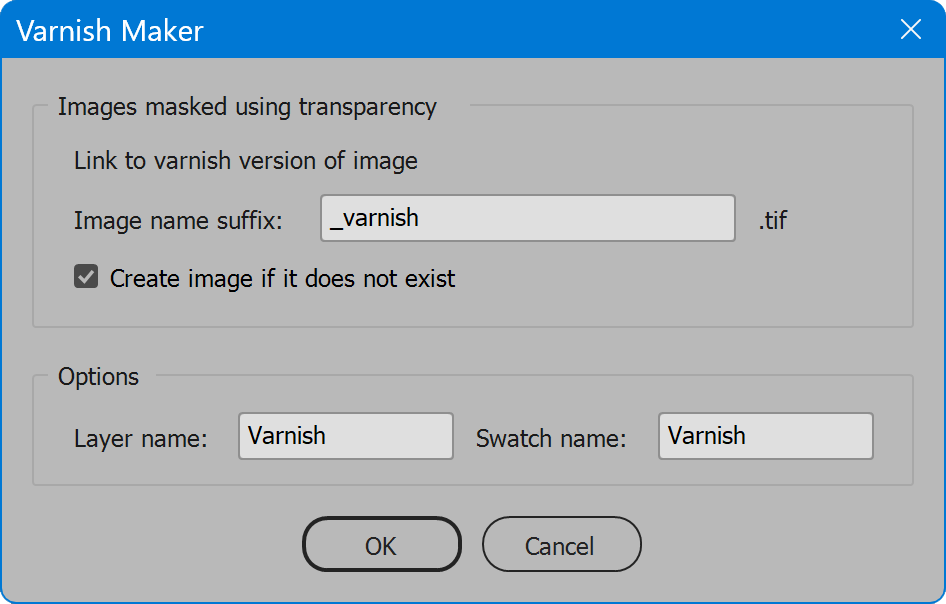
Images masked using transparency — options in this subsection apply to images, when selected, that honor native transparency from Photoshop. For example, when a layer mask is applied to a Photoshop layer or group. In this case, there is no vector shape to draw from. To mimic the masked area for varnish purposes, another image is required, in which the visible area is black and the excluded area is white.
To produce a varnish version of an image masked using transparency, in Photoshop the layer transparency is selected and filled with black. Once flattened, the remainder is white. Lastly, the image is converted to grayscale and saved as a TIFF. A grayscale TIFF is best because once placed in the InDesign document, its fill color may be assigned the desired varnish swatch (and fill set to overprint).
If such images have been prepared, the script only needs to know how to match image names to their varnish version, using the next option.
Image name suffix — the suffix assigned to the varnish version of images. The value may be any text so long as the characters are legal for the file system in use (varies between Mac and Windows). The default is “_varnish”. Then the extension “.tif” is added, which the script expects.
Create image if it does not exist — the script calls on Photoshop to create the image following the steps described above for creating varnish images. A message appears on screen, “Photoshop is creating image… Please wait.” If image creation fails, the user is notified.
The script expects varnish images to reside in the same folder as original images. If an image is not found and Create image if it does not exist is disabled, an open file dialog is displayed, prompting the user to locate the image.
Once a varnish image is linked, it is moved to the varnish layer, its color is assigned the varnish swatch, and fill is set to overprint.
If this option is enabled and any document links are missing or modified, an alert is displayed as missing/modified links are encountered, providing the user the option to either ignore the image or create a varnish shape to match the image frame.
Layer name — the name of the InDesign layer on which varnish elements appear. This may be an existing layer. If the layer of the specified name does not exist, it is created above all other layers.
Swatch name — the name of the InDesign swatch assigned to the fill color of each varnish element. This may be an existing swatch. If the swatch of the specified name does not exist, it is created and defined as color type spot, color mode CMYK, and set to 100% cyan. To override the color set for the varnish swatch, create it beforehand and ensure the value here for name matches. Then the existing swatch is used rather than creating a new one.
Interface 2: Floating Palette
The palette presents the text Varnish: followed by three buttons: Selection, Page, and Spread. Click the desired button to create varnish for the current selection, the entire page, or the entire spread.
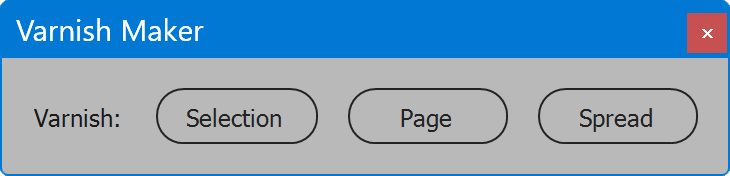
Selection — the result varies based on what is selected, as described in the next section, Creating varnish of current selection.
Page — a rectangle is created on the varnish layer sized to match the entire page including bleed, if any.
Spread — when facing pages is enabled, a rectangle is created on the varnish layer sized to match the current spread and pages it contains, including bleed, if any. If facing pages is disabled, the result is identical to creating varnish for a page.
The palette may be moved on screen and closed at any time. Launch the script again to restore the palette. Or, even while the palette is open, launch the script to change options. The Edit menu item Undo applies to the last varnish element created, whether a selection, page, or spread.
Creating varnish of current selection
When a layout element is selected and the button Selection is clicked, the result varies based on the type of element that is selected.
Images in rectangular frames — a frame of matching position and size is created on the varnish layer. The matching varnish frame includes the keyline (stroke) of the original image frame. The frame dimensions are altered in two circumstances: 1. image content does not fill the frame, in which case, the varnish shape is sized no larger than the image content. 2. The frame extends past the document bleed, in which case, the varnish shape is sized so that it does not exceed the document bleed.
Images masked using clipping path — if the selected image has either a Photoshop or InDesign clipping path applied, the image container is duplicated and the image is removed, leaving a polygon shape that matches the clipping path shape. The new element is moved to the varnish layer and its fill color is assigned the varnish swatch.
Images masked using transparency — see previous section Interface 1: Options for a description of this type of image and how varnish for it is created.
Images without link (pasted graphics) — treated as are images in rectangular frames. For a pasted image masked with transparency – for example, a pasted PNG graphic with transparent background – there is no means to determine the masking. In this case, the entire frame is varnished. It is better to resolve the pasted graphic so that it is linked to a file. Then it is processed correctly.
The script correctly varnishes most images, but in some cases, the result may not be as desired. For example, an image with white background placed on a similarly white page. Visually this appears as if masked, when in fact, it is not. In this case, the script doesn’t know any better and creates a rectangular shape that matches the containing frame. The artificial intelligence required to automate such cases is beyond the scope of this script. Resolve such instances manually.
PDF — treated as are images in rectangular frames.
AI/EPS — treated as are images in rectangular frames, which may not provide the expected result. The created varnish is shaped to match the frame containing the graphic, typically a simple rectangle, rather than the shape of the vector illustration itself. Matching the illustration contours is beyond the intended capability of this script, mainly due to the rarity of needing to do so, but the script still helps in these rare cases. The varnish element created, though simply a rectangle, is a duplicate of the graphic’s containing frame, which retains the sizing and cropping details of the original graphic. Once a varnish version of the graphic is manually created, when it is placed in the rectangle created for the varnish, it will scale and align with the original graphic on the layer below.
Rectangles, polygons, and lines — the selection is copied, moved to the varnish layer, and its fill color and stroke color (if set) is assigned the varnish swatch.
Text — the selected text is converted to outlines, moved to the varnish layer, and its fill color and stroke color (if set) is assigned the varnish swatch.
Language
By default the script language is US English, which does not require further download or configuration. To have the script interface display other languages, choose from the available languages below. Download and copy the .i18n file to the script folder alongside the script. When launched, the script detects the language file and displays interface text in that language. If your language is not listed, download the English file and translate it. The file is plain text formatted as JSON, containing interface text in English, and a second value for its translation, which for the English file is the identical text. Copy the file and rename it to replace “en” with the relevant code for your language, then edit the file to change each line’s second value to the translation in your language. For more detailed instructions of how to edit and install i18n files, see How to Localize Scripts.
English: varnish-maker-en-i18n.zip
Varnish Maker
Change log: varnish-maker.txt
For help installing scripts, see How to Install and Use Scripts in Adobe Creative Cloud Applications.
IMPORTANT: scripts are developed for the latest Adobe Creative Cloud applications. Many scripts work in CC 2018 and later, even some as far back as CS6, but may not perform as expected, or run at all, when used in versions prior to 2018. Photoshop features Select Subject and Preserve Details 2.0 definitely fail prior to CC 2018 (version 19) as the features do not exist in earlier versions. For best results use the latest versions of Adobe Creative Cloud applications.
IMPORTANT: by downloading any of the scripts on this page you agree that the software is provided without any warranty, express or implied. USE AT YOUR OWN RISK. Always make backups of important data.
IMPORTANT: fees paid for software products are the purchase of a non-exclusive license to use the software product and do not grant the purchaser any degree of ownership of the software code. Author of the intellectual property and copyright holder William Campbell retains 100% ownership of all code used in all software products regardless of the inspiration for the software product design or functionality.
