Grommet Marks Photoshop
Script for Adobe Photoshop
Latest update 12/10/2023, version 2.1
The script automates adding grommet marks (dots) to an image, as guides to finishing operators of where to add grommets to banners.
- Create marks along top, bottom, left, and/or right
- Add a specific number of marks or preferred spacing
- Choose layer for marks, or create it
- Specify mark size and color
For the Illustrator version of this script, see Grommet Marks
How-to Video
How to use the script
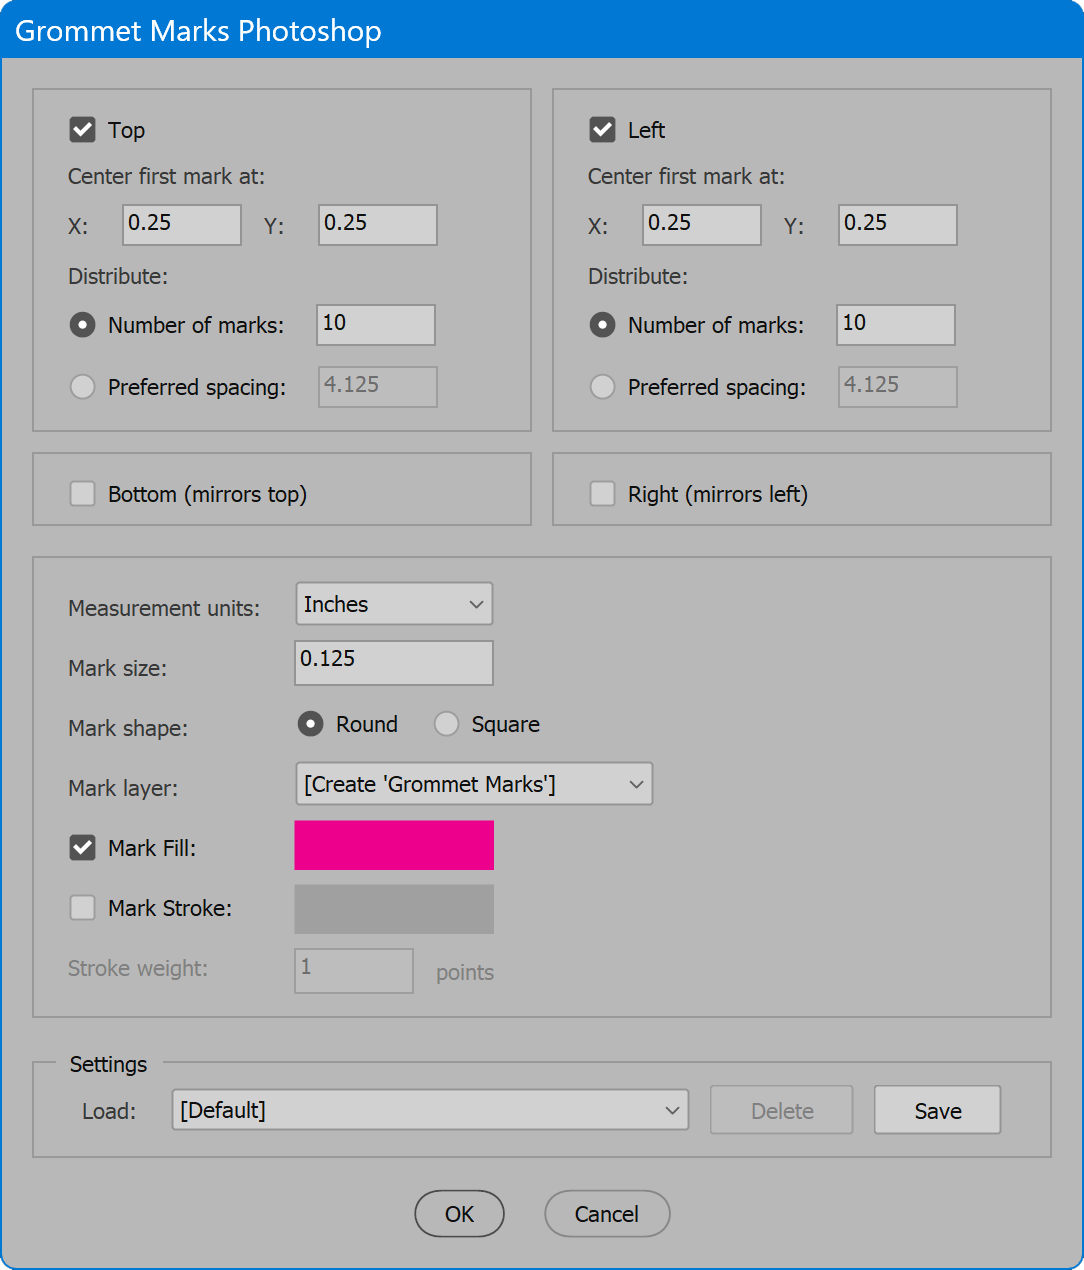
The interface has three sections outlined below. Set options as desired and click OK to begin. Marks are added to the active image (the document currently open and the top-most window if multiple documents are open).
Section 1: Edges on which to add marks
Top/Bottom/Left/Right — enable the desired edges to add marks. At least one edge must be enabled. Top and Left have additional options that determine position, described below. Bottom and Right, if enabled, use the same values as Top and Left, but mirrored on the bottom or right.
Center first mark at X/Y — the distance from the left (X) and top (Y) of the image where marks begin. For Top/Bottom, the last mark will be the same X distance from the opposing edge. For Left/Right, the last mark will be the same Y distance from the opposing edge.
Distribute: Number of marks — enable and enter the number of marks to add, which are spaced equally across or down the selected edge.
Distribute: Preferred spacing — enable and enter the desired distance between marks. Depending on the starting position and dimensions of the image, the script calculates the number of marks, spaced equally, that results in the closest value to the desired spacing.
Section 2: Options
Measurement units — the measurement units used for all values except stroke weight (always points). Select the desired units from the drop-down list. When units change, values are converted to the equivalent value using the new units.
Mark size — the desired size of each mark.
Mark shape — choose round or square.
Mark layer — select the layer to which marks are added. The script looks for a layer named Grommet Marks, and selects it if the layer exists. If not, the script offers to create it, and includes in the list the choice [Create 'Grommet Marks'], which creates a new layer of the name atop all other layers. Or choose any other layer.
Mark Fill — enable to fill each mark with the color selected to the right. Click the colored button to select another color.
Mark Stroke — enable to stroke each mark with the color selected to the right. Click the colored button to select another color.
Stroke weight — enter the desired weight (width) of the stroke in points.
Section 3: Settings
The current options may be saved and restored later. Select from the Load drop-down list to choose saved settings, and the current options are updated. Click the Delete button, and the saved settings selected in the Load drop-down list are permanently removed. Click the Save button, provide a name for the settings, and the current options are preserved. If the name already exists, the user may choose to replace the saved settings. Or click the checkbox Replace settings, and choose the settings to replace.
The script provides default saved settings named [Default]. These settings cannot be deleted but may be updated to the current values. Save settings, click the checkbox Replace settings, and choose [Default].
Grommet Marks Photoshop
Change log: grommet-marks-photoshop.txt
For help installing scripts, see How to Install and Use Scripts in Adobe Creative Cloud Applications.
IMPORTANT: scripts are developed for the latest Adobe Creative Cloud applications. Many scripts work in CC 2018 and later, even some as far back as CS6, but may not perform as expected, or run at all, when used in versions prior to 2018. Photoshop features Select Subject and Preserve Details 2.0 definitely fail prior to CC 2018 (version 19) as the features do not exist in earlier versions. For best results use the latest versions of Adobe Creative Cloud applications.
IMPORTANT: by downloading any of the scripts on this page you agree that the software is provided without any warranty, express or implied. USE AT YOUR OWN RISK. Always make backups of important data.
IMPORTANT: fees paid for software products are the purchase of a non-exclusive license to use the software product and do not grant the purchaser any degree of ownership of the software code. Author of the intellectual property and copyright holder William Campbell retains 100% ownership of all code used in all software products regardless of the inspiration for the software product design or functionality.

