Images And Text From CSV
Script for Adobe Photoshop
Latest update 12/10/2023, version 3.9
The script reads CSV spreadsheet data for image file names and text, searches a selected folder for the images, then merges each image with its text and saves an output file.
- Combine image and text for personalized images
- Name output files by input image name or text content
- An easier way to accomplish data merge in Photoshop
- Process any number of images
- Save working copies of images
Note: this script updates one image layer and one text layer. For multiple image and text layers, images from URLs, and unique output file names, see Variable Images From CSV. To process multiple templates and/or data files, and other advanced features, see Variable Images Advanced.
Images And Text From CSV
How-to Video
Before using the script
Using the script requires some preparation. First is a template image with a layer named “image”, and a text layer named “text”.
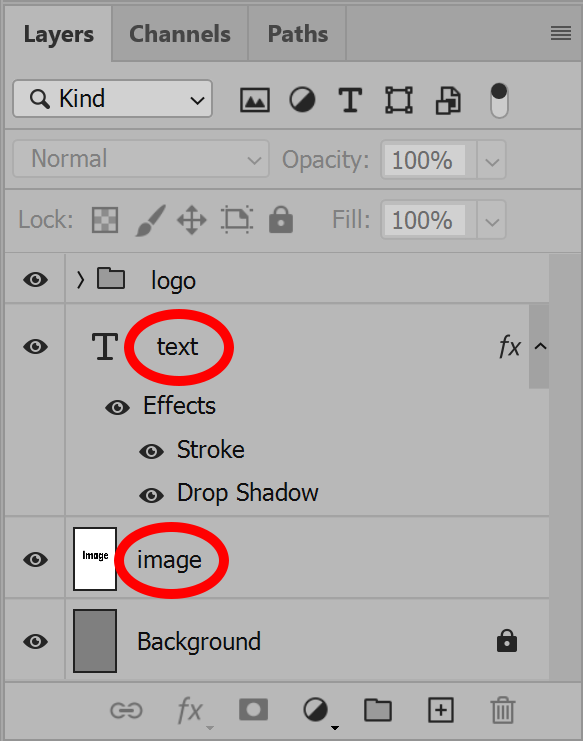
These two layers are the minimum required. There may be other layers or layer groups, a logo for example, or anything to include on all images output.
The second item to prepare is a spreadsheet of image file names and text, saved as Comma Separated Values (CSV format). The spreadsheet must have at least two columns, one for “image”, and another for “text”. The column heads must be precisely these values. Any columns with other labels, or columns beyond the two required, are ignored.
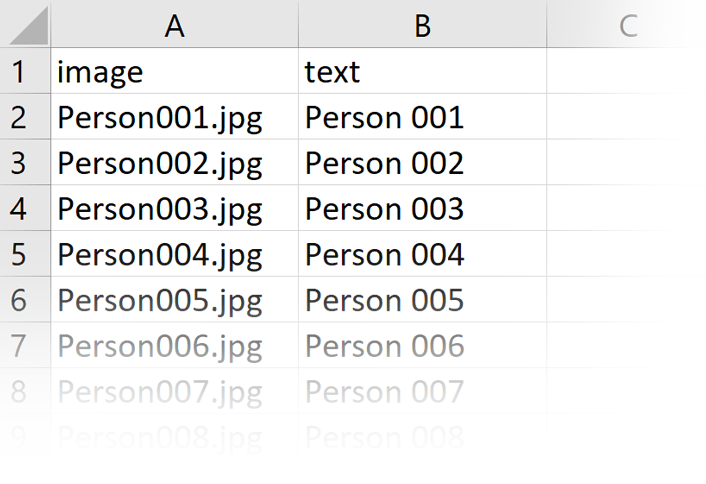
Rows of the column image are the image file names. The full path is not necessary, only the file name. In the script interface, the folder where images are located is selected, and its path is added to arrive at the actual location of each image.
Rows of the column text are the textual contents applied to the layer named “text” copied from the template image.
Example files are available to download, to try the script and better understand how it works before using it in actual production. See the download button below.
How to use the script
With the template image open, run the script.
The interface has three sections: Data file, Images folder, and Output. Select the data file, the images folder, and the output folder. Enable the desired options, and click the OK button to begin. If any problems occur, a log file is written in the output folder.
For each image processed, the layer named “image” is replaced by the input image, which is scaled to match the template image canvas size, cropping as needed to maintain proportions. The text contents of the layer named “text” are replaced by the text in the spreadsheet data. The layer itself is not replaced, only the contents, to preserve any effects applied to the layer.
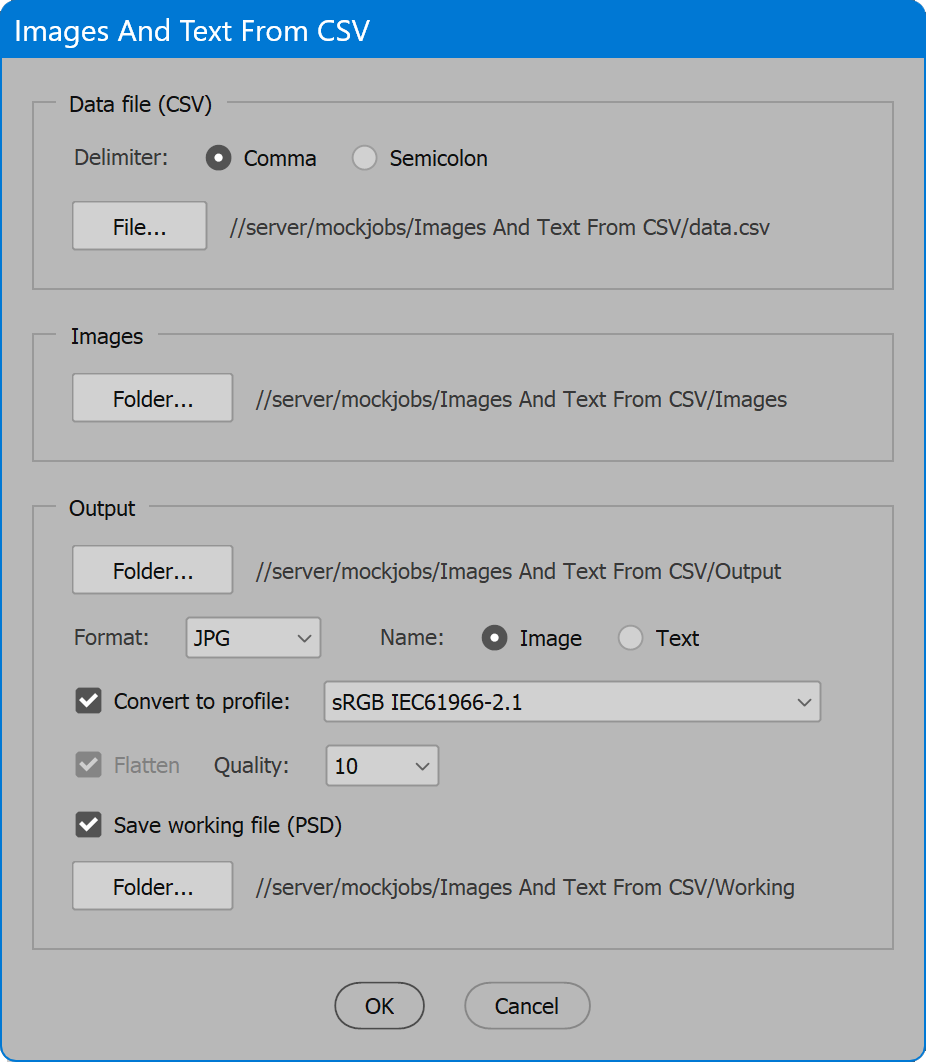
Section 1: Data file (CSV)
Delimiter — the character that separates columns of the data file. The default is comma, normal in the United States. Some European countries use semicolon rather than comma. Select the delimiter used in your region of the world.
File — select the CSV data file.
Section 2: Images folder
Folder — select the folder of images to process. Each image file name in the spreadsheet data that is found in this folder is processed.
Section 3: Output
Folder — select the location to which images are output.
Format — select the file format to output. Choices are BMP, JPG, PNG, PSD, or TIF.
Name — choose to use either the input image file name, or the text column to name output files.
Convert to profile — converts color to the selected profile prior to output. Note that BMP and PNG formats are always converted to sRGB web standard, and the option to select otherwise is disabled.
TIP: Converting to another profile is primarily to make CMYK separations for print, which of course is functionality the script provides. But as well, this option can convert duotones to RGB or CMYK, or convert these and other color spaces to grayscale (use the profile Dot Gain 20%).
Flatten — result is a single “Background” layer. BMP and JPG always perform this step.
Quality — applies to JPEG images. Valid range is from 0 to 12. 0 is extreme compression resulting in low quality. 12 is light compression that is virtually indistinguishable from the original, the highest possible quality, which of course, results in the largest file size. 10 to 12 is recommended for print or other high-quality reproduction. For web images, 5 to 8 is an acceptable range.
Save working file (PSD) — keeps an un-flattened version of the output file for later adjustment, if needed.
Folder — select the location to which working files are saved.
Images And Text From CSV
Example Files
Change log: images-and-text-from-csv.txt
For help installing scripts, see How to Install and Use Scripts in Adobe Creative Cloud Applications.
IMPORTANT: scripts are developed for the latest Adobe Creative Cloud applications. Many scripts work in CC 2018 and later, even some as far back as CS6, but may not perform as expected, or run at all, when used in versions prior to 2018. Photoshop features Select Subject and Preserve Details 2.0 definitely fail prior to CC 2018 (version 19) as the features do not exist in earlier versions. For best results use the latest versions of Adobe Creative Cloud applications.
IMPORTANT: by downloading any of the scripts on this page you agree that the software is provided without any warranty, express or implied. USE AT YOUR OWN RISK. Always make backups of important data.
IMPORTANT: fees paid for software products are the purchase of a non-exclusive license to use the software product and do not grant the purchaser any degree of ownership of the software code. Author of the intellectual property and copyright holder William Campbell retains 100% ownership of all code used in all software products regardless of the inspiration for the software product design or functionality.
