Images Report
Script for Adobe Photoshop
Latest update 12/11/2023, version 2.4
The script scans a folder of images and produces a report of details for each image found. Adobe Bridge provides some of the same details, but the script offers many more, output in formats that open in popular spreadsheet applications.
- Option to include images in subfolders
- Pixels per inch, pixels wide, pixels high
- Color space and profile
- Number of layers, groups, and masks
- Number of alpha channels and paths
- Background layer, spot channels, and keywords
- Generate comma-separated values or tab-delimited text
- Options to output JSON or XML
- Open CSV in popular spreadsheet applications
This script came about for a couple of reasons. First, clients often ask if their images are enough resolution before the images are even placed in a document. To which I can only respond, “It depends.” If placed at the size of a postage stamp, most images probably have enough resolution. But that’s rarely the case. I wanted a means to get pixels dimensions of images into a spreadsheet so I can add a formula that shows the size in inches at 300 pixels per inch. I send that to the client and say, “Placed no larger than the sizes listed, yes, your images have enough resolution. Placed larger, no.” The second reason for the script is for when I get a batch of images to retouch and have no idea of their current state. If all JPEG, I know they’re flattened anyway. But sometimes I get TIFFs that could be flattened, or maybe not. And TIFFs can have adjustment layers, masks, and more. The script lets me get a feel for what I have to deal with. I imagine other users will find similar and other unforeseen uses for the script.
How-to Video
How to use the script
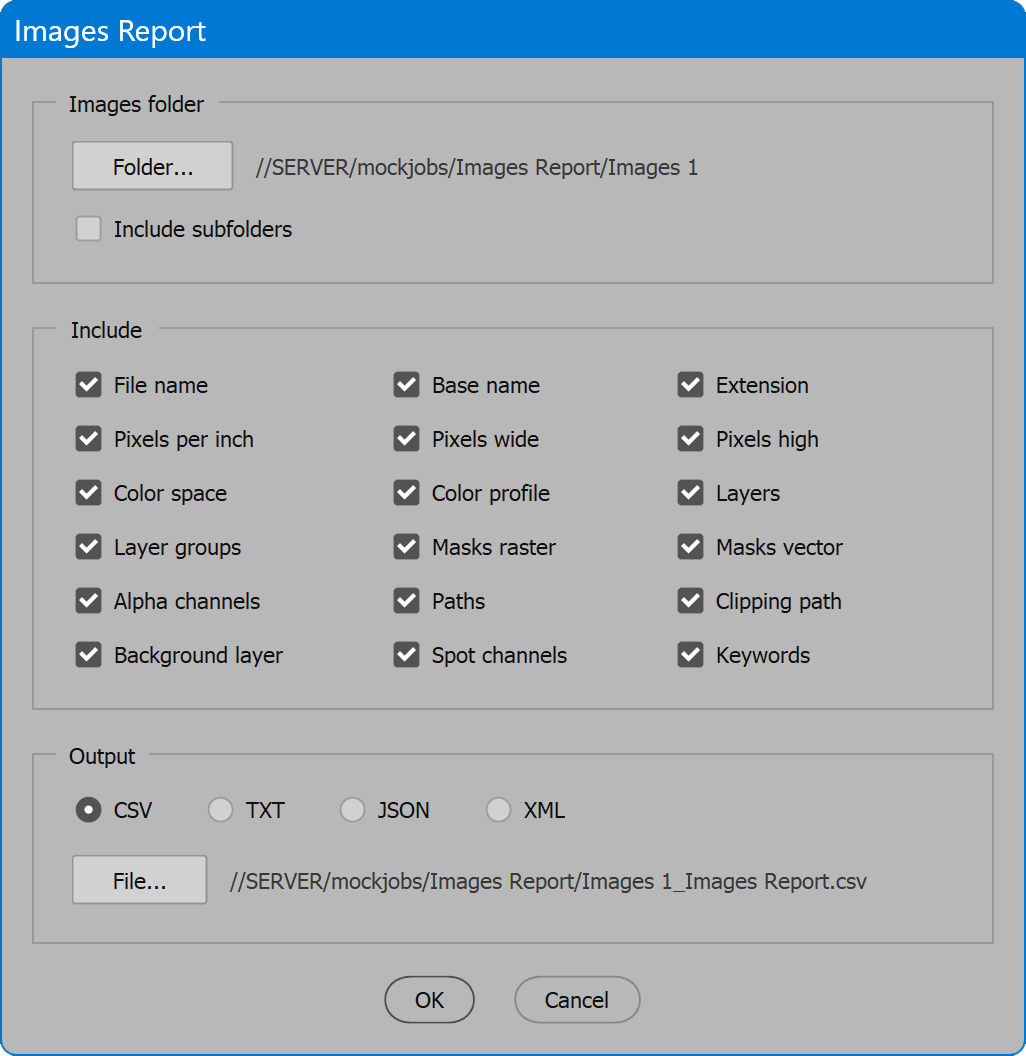
The interface has three sections: Images folder, Include, and Output. Set options as desired and click the OK button to begin. If a report file of the same name already exists, the user may choose to replace it. When processing is complete, the user is notified and presented with a button to open the report.
Section 1: Images folder
Folder — click the button to select a folder of images. All image files found in the folder are opened and examined.
Include subfolders — if enabled, images in all folders below the selected folder are also processed.
Section 2: Include
Each choice represents a column to include in the report. The order of columns in the report match the order shown on screen (order is across first, then down). Any choice unchecked is not included, and a column for it is omitted from the report.
File name — the image file name as it appears in the file system.
Base name — the file name without extension.
Extension — the file extension. This is useful to sort images by file type.
Pixels per inch — the number of pixels one inch represents.
Pixels wide — the width dimension of the image in pixels.
Pixels high — the height dimension of the image in pixels.
Color space — common examples include RGB, CMYK, Grayscale, and others.
Color profile — the ICC profile assigned to the image.
Layers — the number of layers the image contains. This does not include layer groups, counted by the next option.
Layer groups — the number of layer groups the image contains.
Masks raster — the number of raster masks the image contains.
Masks vector — the number of vector masks the image contains.
Alpha channels — the number of alpha channels the image contains.
Paths — the number of paths the image contains.
Clipping path — if a path is set to clipping path, the name of the path.
Background layer — if the bottom layer of the image is set to background, the column lists “yes”.
Spot channels — for each channel set to spot color, the channel names.
Keywords — the keywords from the image metadata.
Section 3: Output
CSV — report is output as comma separated values. To view as a spreadsheet, associate the CSV format with your preferred spreadsheet application, or use “Open with...” and select the application.
TXT — report is output as tab-delimited text.
JSON — report is output as JavaScript Object Notation.
XML — report is output as eXtensible Markup Language.
File — click the button to change the location and/or name of the report file. When the images folder is selected, the location defaults to the parent folder, and the name defaults to folder name plus “_Images Report” and the extension for the chosen output format.
Images Report
Change log: images-report.txt
For help installing scripts, see How to Install and Use Scripts in Adobe Creative Cloud Applications.
IMPORTANT: scripts are developed for the latest Adobe Creative Cloud applications. Many scripts work in CC 2018 and later, even some as far back as CS6, but may not perform as expected, or run at all, when used in versions prior to 2018. Photoshop features Select Subject and Preserve Details 2.0 definitely fail prior to CC 2018 (version 19) as the features do not exist in earlier versions. For best results use the latest versions of Adobe Creative Cloud applications.
IMPORTANT: by downloading any of the scripts on this page you agree that the software is provided without any warranty, express or implied. USE AT YOUR OWN RISK. Always make backups of important data.
IMPORTANT: fees paid for software products are the purchase of a non-exclusive license to use the software product and do not grant the purchaser any degree of ownership of the software code. Author of the intellectual property and copyright holder William Campbell retains 100% ownership of all code used in all software products regardless of the inspiration for the software product design or functionality.

